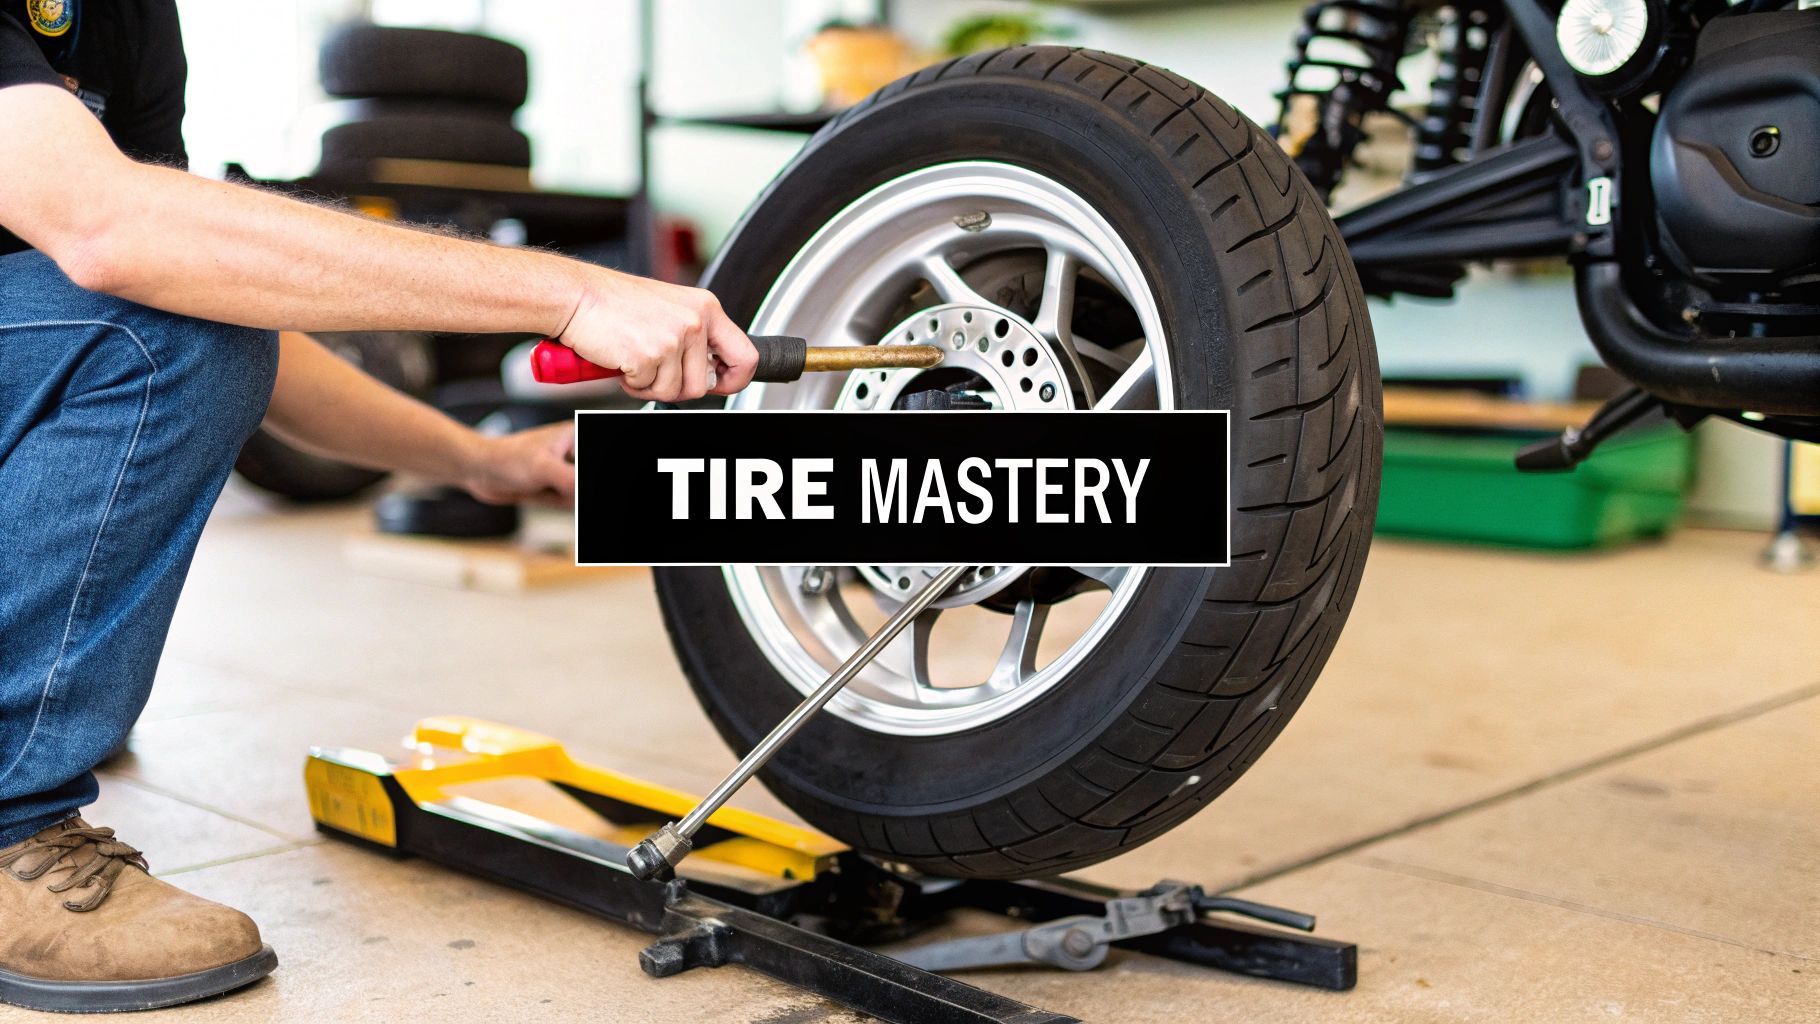
Sooner or later, every electric scooter rider deals with a flat tire. It's practically a rite of passage. But trust me, it doesn't have to be a day-ruiner. The secret to a painless fix isn't brute force; it's being prepared. Getting your tools lined up, knowing whether you have a tubed or tubeless tire, and doing a few quick safety checks will make all the difference.
Your Practical Guide to a Scooter Tire Change
Before you start wrestling with the wheel, taking just a few minutes to get organized can save you a world of frustration. It’s all about having the right gear and a solid game plan.
First things first, you need to figure out what kind of tire your scooter has. Most e-scooters you'll see on the streets in the US and Australia have one of two main types: the classic tubed tire or the more modern tubeless version.
Tubed vs. Tubeless Tires
Tubed tires are just like the ones on a bicycle—they have a separate inner tube inside that actually holds the air. You’ll find these on a lot of entry-level and older scooters. When you get a flat, you're usually just patching or swapping out that inner tube, not the whole tire.
Tubeless tires, as the name suggests, create an airtight seal right against the wheel's rim. They're tougher against punctures and can often be fixed with a simple plug kit, sometimes without even taking the wheel off the scooter.
Pro Tip: Not sure what you have? Check the valve stem where you pump in the air. If you see a locking nut threaded against the rim, it's almost certainly a tubeless tire. If the stem is just smooth rubber coming out of the tire, you're looking at a tubed setup.
Knowing the difference is absolutely critical. The tools you'll need and the steps you'll take are completely different for each. Trying to fix one like the other is a fast track to frustration.
To help you get ready, here's a quick rundown of the gear and characteristics for both tire types.
Essential Gear and Tire Types at a Glance
| Item/Characteristic | Tubed Tires (Traditional) | Tubeless Tires (Modern) |
|---|---|---|
| Primary Tools | Tire levers, wrench set, air pump. | Wrench set, tire levers (optional), air pump, tire plug kit. |
| Repair Focus | Patching or replacing the inner tube. | Plugging the puncture in the tire itself. |
| Common Failure | Pinch flats or punctures to the inner tube. | Punctures from sharp objects; bead seal leaks. |
| Difficulty Level | Can be tricky to avoid pinching the new tube. | Plugs are easy, but breaking the bead seal can be tough. |
| Best For | Budget-friendly models, simple setups. | Higher performance, better puncture resistance. |
This table should give you a clear idea of what you're up against before you even get your hands dirty.
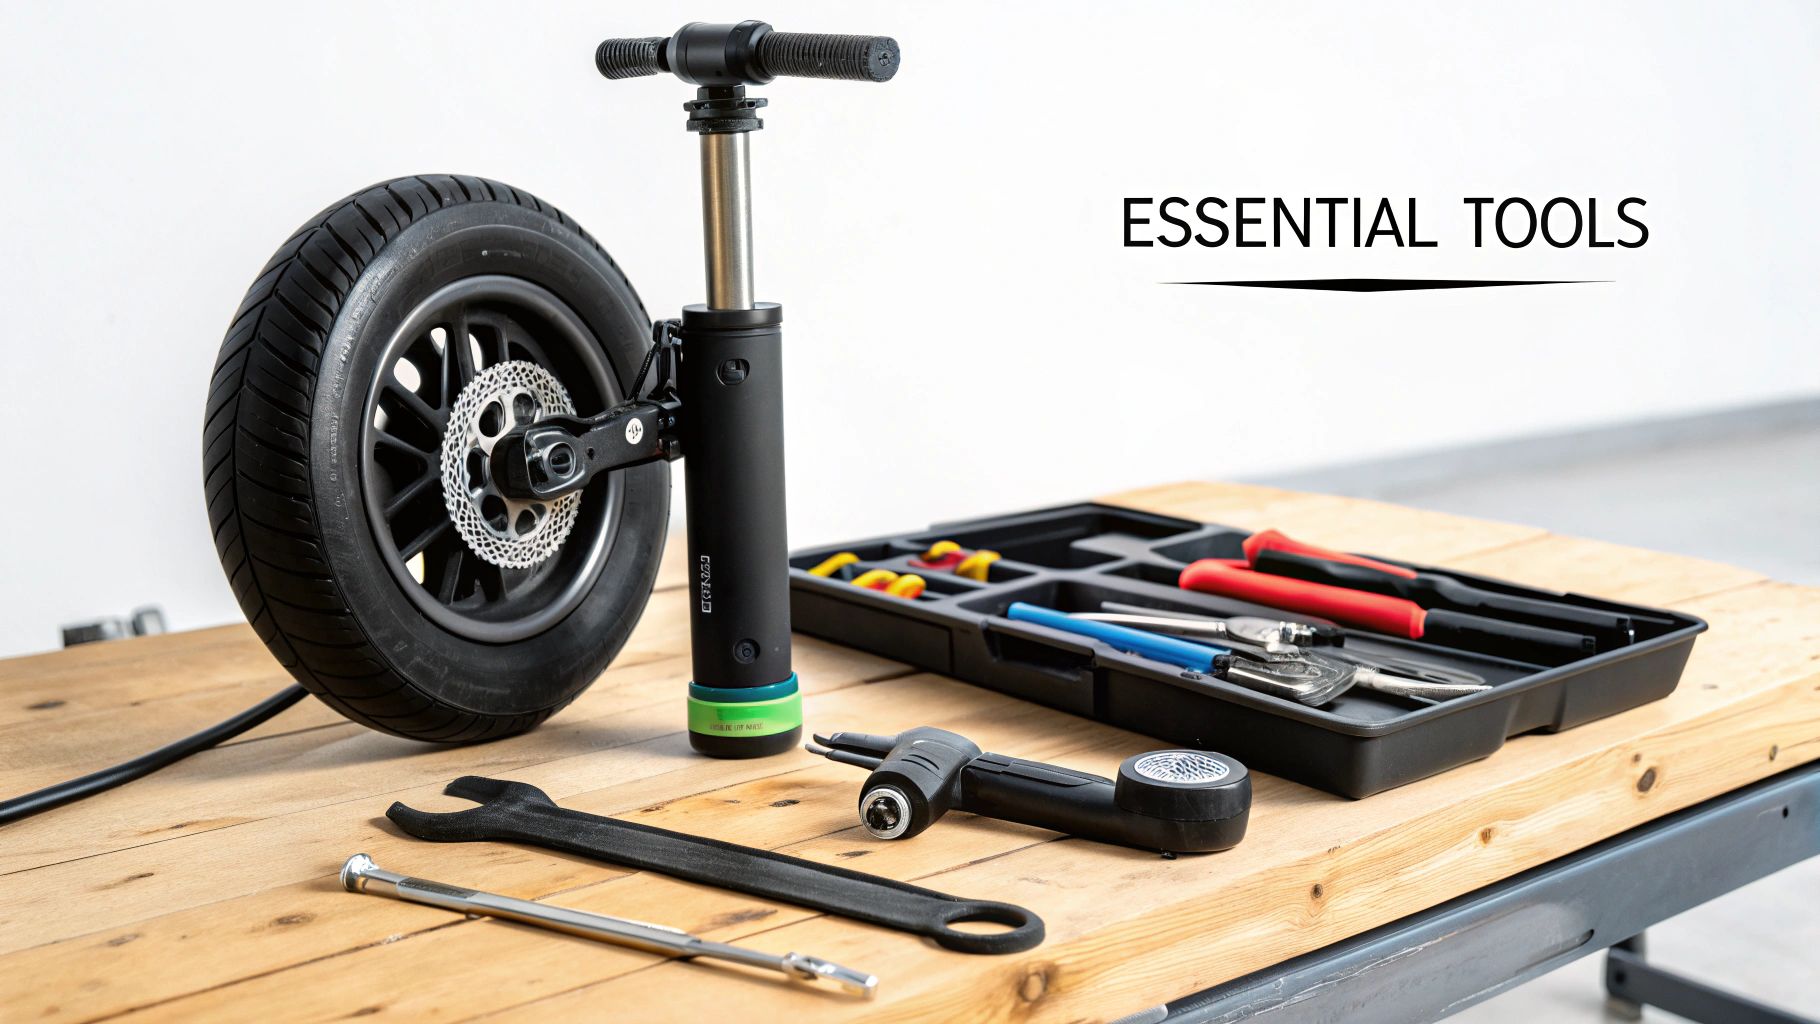
Your Essential Toolkit
Having your tools ready before you start is non-negotiable. There's nothing worse than getting halfway through a job and realizing you're missing a crucial wrench. Here’s a checklist of the basics you'll want for either job:
- Wrench Set or Allen Keys: You'll need these to get the axle nuts off and remove the wheel. The size depends on your specific scooter model.
- Tire Levers: These are a must-have for prying the tire away from the rim. Don't even think about using screwdrivers—you'll just end up damaging the rim or pinching your new tube.
- Air Pump with a Pressure Gauge: To inflate the tire to the correct PSI recommended by the manufacturer. Guessing is not a good idea.
- Soapy Water Solution: A little squirt of dish soap in a spray bottle of water is the best trick in the book. It acts as a lubricant and makes getting the tire on and off the rim so much easier.
It's worth noting that tire technology is always evolving, which is great news for us. The move towards tubeless tires and better pneumatic compounds means fewer flats overall. Some of these newer tires are way more resistant to pinch flats and last longer than the old-school tube types. In fact, some manufacturers claim their improved materials can reduce wear rates by 10–25% in normal conditions. You can dig into these two-wheeler tire market trends to see where things are headed.
Ultimately, knowing your gear and what you’re working with is half the battle. With the right tools and a clear idea of your tire type, you're already on your way to a successful repair.
Wrestling the Wheel and Tire Off Your Scooter
Alright, this is where the real work begins—and where most people throw in the towel. But I promise, getting that wheel and old tire off is more about technique than brute strength. Let's break it down into two parts: getting the wheel off the scooter, and then getting the tire off the wheel.
First things first, let's get that wheel free. On a lot of scooters, especially those with a rear hub motor, there's one extra little step that trips people up: the motor cable.
Getting the Wheel Off the Frame
Before you even think about putting a wrench on those axle nuts, you have to disconnect the motor. Find the cable that runs out of the center of the wheel hub and along the scooter's frame. It’ll have a connector somewhere, often tucked away under a plastic cover or some heat shrink tubing.
- Find and Unplug the Motor Cable: Follow that thick black cable from the wheel hub. Once you find the connector, gently wiggle it apart. Whatever you do, don't just yank on it. A great little pro tip? Snap a quick photo with your phone before you unplug anything. It’s a lifesaver for remembering how it all goes back together later.
- Tackle the Axle Nuts: Now it's time for the main event. Grab your wrench and get ready, because those axle nuts are often torqued on incredibly tight from the factory. If your standard wrench isn't cutting it, you'll need more leverage. A longer wrench or a socket wrench with a breaker bar will give you that extra power. Just remember the classic mantra: righty-tighty, lefty-loosey.
Once you've got the nuts off, look very closely for any washers or spacers. These are critical. They have to go back on in the exact same order and facing the same way. The best way to keep track is to lay them out on a rag in the precise order you took them off. With everything clear, the wheel should slide right out of the scooter frame.
Breaking the Bead and Prying the Old Tire Free
Okay, wheel's off. Now for your next opponent: the tire itself. That stubborn inner edge of the tire that seals against the rim is called the bead. After months or years of use, pressure, dirt, and grime can make it feel like it's been welded to the rim.
Before you even start, let me be crystal clear: Do not use screwdrivers or any other sharp metal tools to pry at your tire. You will absolutely gouge your rim or, worse, instantly puncture your brand-new inner tube when you go to install it. Only use proper plastic or nylon tire levers.
To get that bead to pop loose, you first have to let all the air out. For a standard tubed tire, just press the little pin in the middle of the valve stem until it stops hissing. If you've got a tubeless setup, you might need a valve core remover tool to get the air out quickly and completely.
Now, lay the wheel flat on a soft surface like a piece of cardboard or an old towel. Plant your feet (with clean shoes!) on the tire's sidewall and use your body weight to push down, working your way around the whole circle. You might need to put some real muscle into it. You're waiting to hear and feel a satisfying pop—that's the sound of the bead breaking free.
Using Tire Levers Like a Pro
With the bead broken on both sides, it's time to bring in the tire levers. This part is all about finesse.
- Start by wedging the spoon end of one lever between the tire bead and the rim.
- Hook the other end of that same lever onto a spoke or just hold it firm against the hub. This is your anchor.
- Take your second lever and insert it just a couple of inches away from the first one. Use it to pry a small section of the tire bead up and over the edge of the rim.
- Once you've got a section started, slide that second lever along the rim's edge, almost like a zipper, pulling more of the bead over as you go. This is where that soapy water you mixed up earlier becomes your best friend—a little lubricant makes a world of difference.
After one side of the tire is completely off the rim, you can reach in and pull out the old inner tube (if your scooter has one). Then, just do the exact same thing for the other side of the tire, and you're home free. The old tire is off, and you've won the battle.
Getting the New Tire On: Tubed vs. Tubeless Tactics
Alright, the old tire is off, and you're staring at a bare rim. Now for the main event: wrestling that new tire into place. This is where the path splits depending on what kind of tire you're working with.
Getting a tubed tire on is all about avoiding the dreaded "pinch flat"—that infuriating moment you puncture the new inner tube with your tire lever. For tubeless, it's a different game entirely. Your one and only goal is to create a perfect, airtight seal between the tire's bead and the rim. Let's get into it.
The Art of Installing a Tubed Tire
When you’re dealing with an inner tube, a little bit of prep work will save you a world of hurt later. The single best tip I can give you is this: partially inflate the new inner tube before you do anything else. Just a few pumps to give it some shape is all you need. This makes it so much less likely to get twisted up or caught under the tire bead as you work.
- Give everything a quick check. Run a hand along the inside of the new tire to feel for any sharp bits or weird defects from the factory. Now, with the tube slightly puffed up, tuck it inside the tire.
- Start with the valve. Find the hole in the rim and poke the tube's valve stem through it. This is your anchor point. From here, you can start working one side of the tire onto the rim. This first side should pop on pretty easily with just your hands.
- Time for the tricky part. Getting that second bead over the rim is where the fight really begins. Use your hands as much as you can, pushing the bead down into the center channel of the rim as you work your way around. When it gets too tight to push, that's when you bring in the tire levers. The key here is to guide the bead over the edge, not just pry with brute force.
This is a common spot to get stuck. If you're really fighting it, our detailed guide on how to repair a scooter tire has some extra troubleshooting tricks that can make a huge difference.
Pro Tip: Your best friend here is soapy water. A little bit sprayed on the tire bead acts as a fantastic lubricant, making the rubber slide on so much easier. This trick alone can be the difference between a smooth job and a damaged tube.
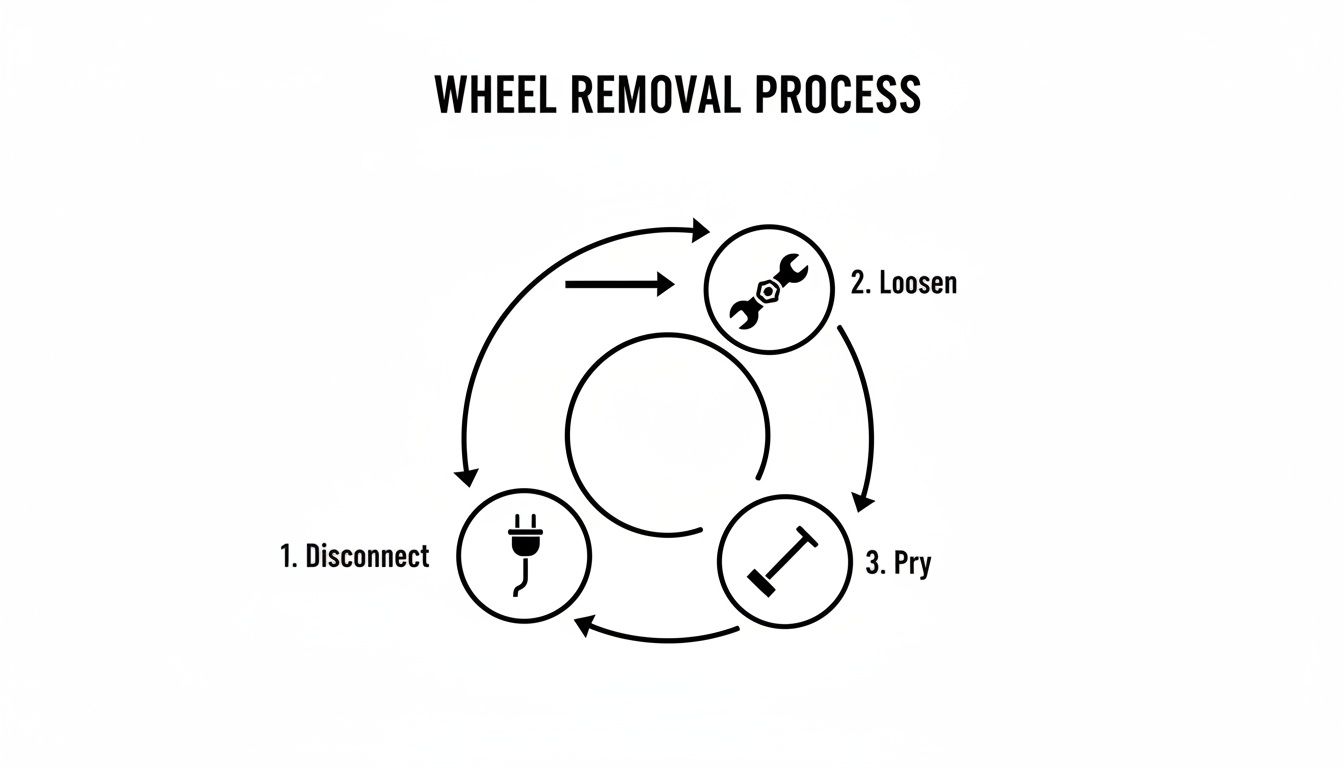
This diagram breaks down the wheel removal you just finished into its three core actions. A good tire change always starts with a methodical disassembly—disconnecting what you need to, loosening the right hardware, and carefully getting the wheel free.
Mastering the Tubeless Tire Installation
Installing a tubeless tire is less about finesse and more about creating that perfect, leak-free seal. You don't have an inner tube to worry about, but any speck of dirt or old gunk can be the cause of a frustratingly slow leak down the road.
First things first, clean that rim like you mean it. Wipe down the entire channel where the tire bead sits. Get rid of any old sealant, grime, or bits of rubber. You need a spotless surface for a truly airtight connection.
Next, grab your soapy water again and generously lubricate both beads of the new tire. Just like with tubed tires, this makes life much easier. Work one side of the tire onto the rim by hand.
The real challenge is "seating the bead." This requires a powerful, sudden blast of air to force the tire beads to snap into the rim's walls. While a good floor pump can sometimes get the job done, an air compressor is your most reliable tool for this.
- To get maximum airflow, temporarily remove the valve core from the valve stem.
- Hit it with a strong blast of air from the compressor.
- You're listening for two loud, distinct 'pops' or 'pings'. That’s the sound of success—each bead locking into place.
Once you hear those pops, you can reinstall the valve core and inflate the tire to the recommended pressure. You've just locked in a secure, safe tire for your scooter.
Troubleshooting Common Installation Issues
Even with the best technique, things can sometimes go sideways. You might struggle to get the bead to seat, or you might find a leak after you thought you were done. Here’s a quick rundown of the most common hiccups I see and how to fix them.
| Common Problem | Likely Cause | How to Fix It |
|---|---|---|
| Tire bead won't seat (Tubeless) | Not enough airflow or lubrication. | Remove the valve core for max airflow. Use more soapy water on the beads and rim. An air compressor is highly recommended. |
| Inner tube got pinched (Tubed) | Using too much force with tire levers or the tube was twisted. | Deflate, unseat one side of the tire, and reposition the tube. Partially inflating the tube before installation helps prevent this. |
| Slow leak after installation | Debris on the rim, a damaged valve stem, or a poor bead seal (tubeless). | Deflate and re-inspect the rim for cleanliness. Check that the valve stem is tight and undamaged. Re-seat the tire if needed. |
| Tire feels wobbly or uneven | The bead isn't seated evenly all the way around the rim. | Deflate the tire completely. Lubricate the beads again and re-inflate, watching to ensure the bead seats uniformly on both sides. |
Most installation issues come down to preparation and patience. Rushing the job is the fastest way to make a mistake, so take your time, use plenty of lubrication, and double-check your work as you go.
Putting It All Back Together: Reassembly and Safety Checks
Alright, the hardest part is over. You’ve wrestled that new tire onto the rim, and now it’s time for the home stretch. But don't get complacent here—reassembling your scooter correctly is just as critical as getting the tire on in the first place.
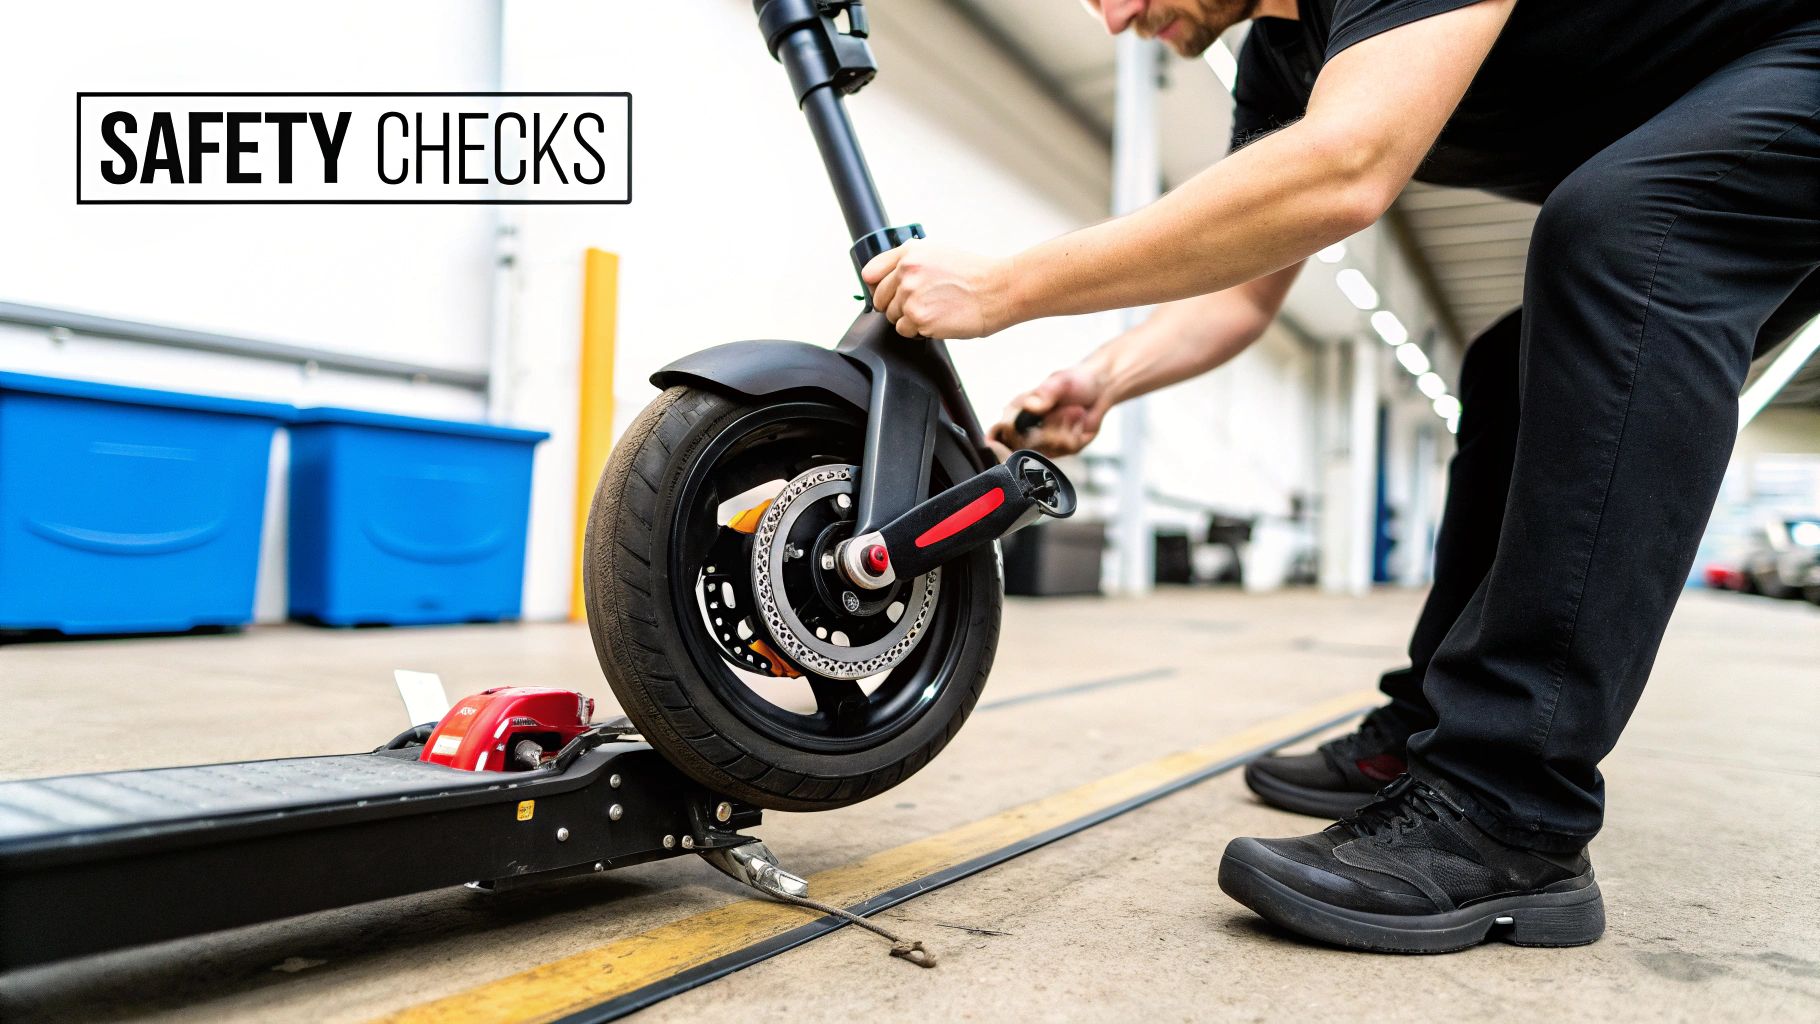
This final stage is all about making sure your scooter is 100% roadworthy. A loose nut or a misaligned brake can quickly turn your successful repair into a very bad day. Let's get it right.
Getting the Wheel and Brakes Aligned
Start by gently guiding the wheel back into the scooter’s frame. Remember those washers and spacers you carefully set aside? Now's their moment. Make sure they go back on the axle in the exact same order they came off.
Once the axle is slid fully into the dropouts, go ahead and hand-tighten the axle nuts on both sides. This will hold the wheel in place while you check the alignment. Before you even think about grabbing a wrench, give the wheel a good spin. You’re looking for two things:
- Is it wobbly? The wheel should spin straight and true. If you see a wobble, it’s not seated correctly in the frame.
- Are the brakes rubbing? Listen for any scraping or hissing sounds coming from the brake pads.
If you hear brake rub, just loosen the axle nuts slightly and give the wheel a little nudge side-to-side until it spins without any noise. This tiny adjustment makes a world of difference for your ride quality and saves your brake pads from wearing out too fast.
Once the wheel is spinning freely and sitting straight, it’s time to lock it down. Don’t skip this. A loose axle nut is a recipe for disaster—it can cause the wheel to shift or even come completely off while you’re riding.
Why Correct Torque Is So Important
The best-case scenario is using a torque wrench to tighten the nuts to the manufacturer's spec. But let’s be real, not everyone has one. If you're using a standard wrench, aim for "snug plus a quarter turn." Tighten the nuts firmly until they're snug, then give them one last, confident quarter-turn. They should feel solid, but you shouldn't be straining to the point of stripping the threads.
If you disconnected a motor cable, now’s the time to plug it back in. Look for the little arrows or pins on the connector, line them up, and push them together until you hear or feel a solid click. Make sure the cable is tucked away safely where it can't get snagged on anything.
Final Inflation and the Spin Test
With the wheel bolted securely onto the frame, it’s time to get the air pressure right. Check the sidewall of your new tire for the recommended PSI (pounds per square inch). Use a pump with a gauge you trust and inflate it to the correct pressure.
Honestly, proper inflation is the single most important piece of tire maintenance. It impacts your scooter's handling, range, and ability to resist flats more than anything else.
Now, give the wheel one more spin. It should turn smoothly and silently for a few seconds. If you hear any new clicks or feel any resistance, stop and figure out what’s causing it before you go any further.
The Final Pre-Ride Inspection
You're so close! Before you jump on and take off, run through one last quick safety check. This isn't just about finishing the job; it's about being a responsible rider. For a deeper dive, our complete guide to electric scooter safety tips has you covered.
Your Quick Pre-Ride Checklist:
- Check the Brakes: Squeeze the brake levers. Do they feel firm and responsive? Roll the scooter forward and hit the brakes to make sure they actually stop the wheel.
- Give It a Once-Over: Take a final look at your work. Are the axle nuts tight? Is the motor cable secure and out of the way? Does the valve stem look straight?
- Listen Up: Roll the scooter back and forth a bit. Listen for any weird clicks, scrapes, or sounds that weren't there before.
If everything passes the test, you’re ready for a short, slow test ride in a safe spot. Get a feel for it, test the brakes one more time at low speed, and listen for any issues. If it all feels solid and smooth, then congratulations—you just changed your own scooter tire
Pro Tips for Tire Longevity and Fewer Flats
While it’s a great skill to know how to change a tire, the real win is not having to do it in the first place. A few minutes of simple, proactive care can save you hours of greasy hands and frustration. Trust me, it's worth it to keep you on the road and out of the garage.
The single biggest thing you can do for your tires is to keep them at the right pressure. I can't stress this enough. Properly inflated tires handle better, extend your range, and are way more resistant to punctures. Underinflation is the number one cause of the dreaded "pinch flat," where the inner tube gets squeezed between the rim and whatever you just hit.
A properly inflated tire is your best defense against flats. It holds its shape better, rolls more efficiently, and protects the inner tube and rim from damage. Making a weekly pressure check part of your routine takes less than two minutes and is the best investment you can make in your scooter's reliability.
Tire Sealant Is Your Secret Weapon
Another fantastic preventative measure is using tire sealant. This gooey stuff lives inside your tire and instantly plugs small punctures as they happen—often before you even know they're there.
- For Tubeless Tires: Using sealant is a no-brainer. Most tubeless setups come with it from the factory, and it's essential for keeping that airtight seal. You'll just need to top it up every six months to a year as it slowly dries out.
- For Tubed Tires: You can also inject sealant directly into your inner tubes. It works the exact same way, plugging tiny holes from thorns or glass before they can ruin your ride. It’s a cheap and easy upgrade that offers massive peace of mind.
Make Regular Inspections a Habit
Get into the habit of giving your tires a quick once-over before you ride. A simple visual inspection can help you spot trouble before it leaves you stranded. Just take a quick look at the tread and sidewalls. You're looking for embedded glass, small nails, or any weird cuts or bulges.
Catching a small piece of debris early means you can pull it out and keep an eye on things. If you leave it in, it can work its way deeper and cause a sudden flat later on. This quick check also helps you monitor your tread depth, so you know when a replacement is due before your safety and performance take a hit. Understanding these maintenance principles is key. While it's written for cars, this guide offers great insights into the value of regular checks. Discover a comprehensive car maintenance checklist that includes important tire care advice.
For commercial operators, this isn't just about convenience—it's about the bottom line. The downtime and cost of changing scooter tire parts add up. Delivery fleets, for example, might see tire replacements 30–50% more frequently due to constant use. For a fleet of 5,000 scooters, that could mean annual tire change costs between USD 112,500–187,500. This makes proactive maintenance not just smart, but a financial necessity.
For more detailed tips on keeping your tires at the perfect pressure, take a look at our guide on https://www.punkride.com/blogs/news-advice/inflating-bike-tires—the principles are almost identical and super helpful.
Got Questions About Your Scooter Tires? We've Got Answers.
We've been swapping out scooter tires in our workshop for years, and trust me, we've seen it all. From mysterious slow leaks to tires that look like they've been through a warzone. Over time, we've noticed the same questions pop up again and again. So, let's get right to it and answer some of the most common ones we hear from riders just like you.
Can I Just Slap a Tubeless Tire on My Tubed Rim?
This is easily the question we get asked the most. The short answer? It's a bad idea.
To run a tubeless setup, your scooter's wheel rim needs to be specifically designed for it. Tubeless rims have a special shape, with little humps or ridges on the inside that lock the tire's bead into place, creating that critical airtight seal. Your standard tubed rim just doesn't have that.
If you try to force a tubeless tire onto a regular rim, it simply won't hold air. You can glob on all the sealant you want, but it's not going to work. We've seen people try all sorts of DIY conversion hacks with special tapes and valves, but it's a huge gamble that can lead to your tire deflating suddenly while you're riding. Not fun.
The Bottom Line: Stick with the tire type your scooter was built for. If you're dead set on the puncture-resistance of a tubeless system, you’ll need to invest in a whole new set of tubeless-ready wheels.
How Often Should I Really Check My Tire Pressure?
Be honest, how often do you check it? If you want to avoid problems, make it a weekly habit.
Yeah, I know, once a week sounds like a lot. But these little scooter tires lose air way faster than the ones on your car. A quick check with a decent pressure gauge takes less than a minute, and it’s the single best thing you can do to prevent flats and keep your scooter riding smoothly.
Riding on low pressure is the #1 killer of inner tubes, causing those nasty pinch flats. It also tanks your handling, makes the ride feel sluggish, and can even drain your battery faster. Think of it this way: you wouldn't go for a run with your shoelaces untied, so don't make your scooter ride on squishy tires.
What's the Real Story with Solid Airless Tires?
Solid tires definitely sound like the dream, right? No more flats, ever. And it's true, you will never get a puncture with a solid tire. But that superpower comes with some serious trade-offs.
- The Ride is Rough: Solid tires have virtually zero give. You're going to feel every single crack in the pavement, every pebble, every bump. It can make for a bone-rattling ride, especially on the varied road qualities you find across the US and Australia.
- Grip Can Be Sketchy: The hard rubber compound used in most solid tires just doesn't grip the road as well as a traditional pneumatic tire, especially when it’s wet.
- They're a Nightmare to Install: Getting these things on the rim is a serious workout. It usually involves boiling them in water to make them a bit more pliable and then wrestling them into place with a ton of brute force.
So, are they worth it? If you ride on perfectly smooth bike paths and your absolute top priority is avoiding flats, maybe. For most riders, the huge sacrifice in comfort and safety just isn't a good deal.
How Do I Know When It’s Time for a New Tire?
Don't wait for a blowout to be your reminder. Being proactive is all about safety. Here are the dead giveaways that your tire's best days are behind it:
- Bald is Bad: Look for the tread wear indicators—they're little raised bars sitting inside the tire's main grooves. Once your tread is worn down even with those bars, it's time.
- Cracks, Splits, and Bulges: Give the sidewalls a good look. Any visible cracks, dry rot, or weird bulges are red flags for structural failure. Replace that tire immediately.
- The "Square" Tire: If you do most of your riding in a straight line, the center of the tire can wear down and become flat, or "squared off." This really messes with your scooter's ability to lean into turns.
- You're Getting Flats All the Time: If you're suddenly getting one puncture after another, it’s a good sign the tire casing itself is worn thin and can no longer protect the inner tube properly.
Swapping out tires is just part of scooter life now. As more people choose two-wheeled transport, the market is booming. The global two-wheeler tire market was projected to hit around USD 11.33 billion by 2025, driven by both new scooter sales and all of us replacing worn-out rubber. This is especially true in places like Asia-Pacific, where urban growth is making scooters more popular than ever. You can actually read more about these global tire market trends to see just how big this is getting.
At Punk Ride LLC, our mission is to keep you rolling safely and with a smile. Whether you need high-grip tires or are looking for your next electric ride, we've got you covered. Check out our hand-picked collection of top-tier e-scooters and gear over at https://www.punkride.com.
Share:
Finding the Best Lock for E Scooter Security
A Rider's Guide to Tires for Electric Scooters