


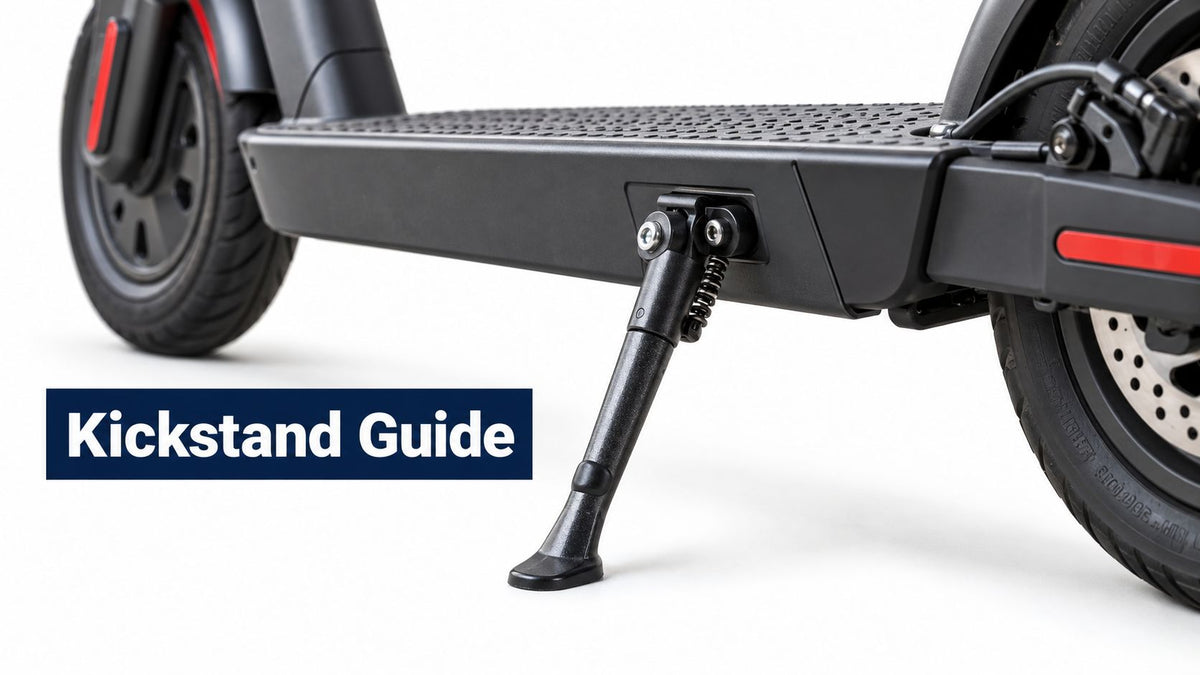
You've just carried your electric scooter out of a café, and the kickstand folds back before you've found a safe place to put it. On a flat pavement, that's irritating. On a sloped kerb, loose gravel, wet grass, or a crowded cycle parking area, it can become a topple that damages controls, panels, or the frame.
The electric scooter kickstand is more than a parking leg. It controls how the scooter leans, where its centre of mass sits, and, on some models, whether the electronics permit startup. The right choice depends on the scooter's weight, mounting points, terrain, and local riding conditions. A compact side stand may suit a lightweight city scooter, while an adjustable or reinforced design makes more sense for a heavier commuter machine used around uneven pavements.
Why Your Kickstand Matters More Than You Think
A rider returning from a coffee stop often expects a simple task: unfold the scooter, release the stand, and ride away. Instead, the stand may sink into soft ground, the scooter may lean too far, or a worn hinge may let the deck wobble. The problem doesn't always appear dramatic at first. A small shift from a bag hanging on the handlebar can be enough to send the scooter onto its side.
Parking hardware became more important as scooters changed from simple stand-up vehicles into heavier, battery-powered transport. Stand-up scooters date back to the early twentieth century. The motorised Autoped was manufactured in 1915, while modern stand-up scooters re-entered the market in 1986 with Go-Ped's Roadster and Sport, according to the RI electric scooter safety review. Nimrod Ricardo Sapir later developed and produced a motorised folding e-scooter using lithium-ion batteries and a brushless hub motor during 2009 to 2010, helping create the practical folding platform used by modern commuters. Dockless sharing systems were being rolled out in major cities by 2017, increasing the need for stands that tolerate repeated stops and rough handling.
That history explains why a missing or poorly fitted stand isn't a cosmetic inconvenience. Your scooter's centre of mass pushes through a small contact area, so the support angle and ground condition matter. If you're folding the machine for a train, a guide to folding your scooter safely is useful, but folded transport doesn't remove the need for a stable parking setup.
Practical rule: Use the stand only when it's fully deployed on firm, reasonably level ground. Treat soft, sloped, or broken surfaces as a manual-support situation.
The safety context is serious. The U.S. Consumer Product Safety Commission recorded 533 micromobility-related fatalities in the United States from 2017 through 2024, while e-scooter injuries rose from about 10,500 in 2017 to nearly 80,000 in 2024, a 662% increase, as reported in its micromobility deaths, injuries, and hazard patterns report. Those figures don't prove that a kickstand caused any individual incident, but they reinforce why basic stability, handling, and parking habits deserve attention.
Comparing Common Kickstand Types
The three useful categories are centre stands, side stands, and heavy-duty or adjustable stands. They solve the same parking problem with different support geometries.
A centre stand places support closer to the scooter's middle and can spread the load more evenly. It suits heavier scooters and firm, flat surfaces, although it may require more deliberate deployment and can add hardware beneath the deck. A side stand is quicker. You swing one arm down, lean the scooter onto it, and move on. That convenience works well for compact urban scooters, but a single contact point gives uneven ground more influence over the final lean.
Centre stands
A dual-leg or central arrangement can keep the scooter more upright and distribute weight across a broader support area. It's the sensible choice for a heavy commuter scooter that spends most of its time on level pavement. The trade-off is clearance. A stand mounted under the deck may scrape a steep kerb or interfere with low obstacles.
Side stands
Side stands win for speed and simplicity. They're common on lighter models because the rider can park without shifting the scooter into a central balancing position. On grass, broken paving, or a cambered road, however, the scooter's lean can become excessive. A wide foot helps, but it can't compensate for a poor mounting angle or loose hinge.
Heavy-duty and adjustable designs
An adjustable stand lets you change effective height and lean angle. That matters when one scooter moves between smooth indoor floors, uneven UK pavements, a grassy park, and outdoor paths in Australia. Reinforced arms and larger feet generally provide more confidence, though they can add weight and may occupy more space when folded.
| Type | Strength | Limitation |
|---|---|---|
| Centre | Balanced support for heavier scooters | More deck hardware and possible clearance issues |
| Side | Fast deployment and compact packaging | More sensitive to slope and soft ground |
| Heavy-duty adjustable | Better tuning for terrain and load | Bulkier and more complex |
If your scooter uses a proprietary frame bracket, don't assume a universal replacement will fit. For compatible transport accessories around compact mobility devices, Snapngo scooter attachments can help you compare how accessory hardware is designed around a particular platform.
A short visual demonstration can also make the difference between a stand that looks secure and one that locks correctly.
Materials and Compatibility Considerations
Material selection starts with the scooter, not the product photograph. A slim aluminium side stand may be perfectly adequate on a light city commuter, while a large dual-motor scooter places greater bending and vibration loads on the arm, hinge, and mounting plate. The stand doesn't need to be the heaviest part on the scooter, but it does need enough stiffness to resist flex when the machine settles onto it.
Steel usually offers useful rigidity and impact tolerance. It can be heavier, and exposed steel needs protection against water and road grime. A painted or coated steel stand is a practical option for riders who regularly park outdoors, provided the coating remains intact around bolt holes and hinge points.
Aluminium reduces mass and works well where the frame and stand are designed together. Its weakness is that a thin arm or poorly supported mounting area can bend after a hard side impact. Once aluminium has taken a permanent bend, tightening the bolts won't restore the original geometry.
Reinforced plastic can appear on lighter stands, brackets, or hinge components. It resists some corrosion and keeps weight down, but cracks around fasteners or pivot points should be treated as replacement signs, not repaired with glue.
Check fitment before strength
A replacement must match more than the scooter's advertised model name. Check:
- Bolt pattern: Measure hole spacing and compare the bracket shape, thread type, and bolt length.
- Clearance: Confirm the deployed stand won't contact the tyre, brake cable, motor housing, or folding mechanism.
- Ground reach: The foot must touch before the scooter's deck, motor, or bodywork becomes the lowest point.
- Load direction: Look at where the battery, motor, and rider accessories place weight when parked.
- Weather exposure: UK rain, coastal air, Australian heat, and US winter road treatment can all affect fasteners and hinge movement differently.
Regional design differences matter because products sold in the UK, EU, US, and Australia may use different frame proportions, mounting standards, lighting arrangements, and compliance configurations. A stand built for a light European commuter isn't automatically suitable for a wide off-road frame. The same caution applies to electric bikes, where chainstays, disc brakes, and battery placement can leave little room for a scooter-style bracket.
Don't judge compatibility by wheel size alone. Two scooters with similar tyres can have very different deck heights and weight distributions. Match the stand to the frame mounting surface and verify that the retracted arm stays clear during folding and riding.
Installation and Adjustment Basics
A kickstand installation succeeds when the bracket sits squarely, the fasteners clamp the frame without damaging it, and the deployed arm creates a controlled lean. Rushing the job usually creates one of two problems: a stand that rattles because the hardware isn't clamped properly, or a stand that binds because the bracket is misaligned.
Mount it without guessing
- Power down first. Switch off the scooter and keep the throttle clear. If the battery is removable and the manual permits removal, take it out during the work.
- Support the frame. Use a stable work surface or carefully support the scooter so it can't roll while the old stand is removed.
- Photograph the original position. Note the bracket orientation, washer placement, and the direction in which the arm folds.
- Remove the old hardware. Use the correct Allen key, Torx driver, socket, or spanner. A rounded fastener needs proper extraction, not increasing force with the wrong bit.
- Dry-fit the replacement. Thread the bolts by hand first. If the holes don't align naturally, stop and reassess compatibility.
- Tighten evenly. Alternate between fasteners so the bracket draws down squarely. Don't over-tighten, since stripped threads can turn a simple replacement into a frame repair.
The stand angle determines how far the scooter leans. Manuals and troubleshooting guidance note that incorrect height can leave the scooter too upright or too far over, with either position reducing stability. Lowering the effective height can improve the lean angle, but only if the locking mechanism still engages fully and the scooter remains supported within a stable footprint. The guide to adjusting handlebar height covers the same general maintenance principle, measure first, adjust deliberately, and test before riding.
Test the geometry
Deploy the stand on a flat, firm surface. Check that the foot sits flat rather than on an edge, then apply light pressure to the handlebar from different directions. The scooter should settle without rocking, and the stand should not creep, fold, or twist.
Next, fold and retract the stand several times. Confirm that it clears the tyre, deck, brake components, and folding latch. Take a short ride, return to the same surface, and recheck the fasteners. Vibration can reveal a mounting problem that wasn't visible during the workbench test.
Adjustment check: A stand that feels tight but doesn't lock positively is not ready for service. Fix the engagement problem before relying on it.
Safety Interlocks and Startup Issues
A scooter that refuses to power on may have a kickstand-related lockout rather than a dead battery. Some designs use a kickstand sensor or switch as part of a safety interlock. The intended logic is simple: if the scooter thinks the stand is deployed, it may block drive activation to reduce the chance of accidental movement.
The trouble starts when mechanical and electronic states disagree. The arm may look retracted while a magnet, actuator, switch, or sensor remains out of position. Dirt near the sensor, a bent bracket, damaged wiring, a weak connector, or a software lock can create the same symptom as an electrical failure.
Diagnose the simple causes first
Start with the physical position. Fully retract the stand and inspect the hinge, stop, and sensor area without forcing anything. Then check the display or mobile app for a lock state, brake warning, or other visible error. If the scooter has a brake cutoff, release the brake lever and make sure it returns completely.
Use this sequence:
- Re-seat the stand: Move it through its full range and listen for a clear mechanical stop.
- Inspect the sensor area: Remove mud or grit with a dry cloth. Don't flood switches or connectors with cleaner.
- Check visible wiring: Look for pinched insulation near the bracket and folding points.
- Confirm app status: A software lock can imitate a hardware problem.
- Restart according to the manual: Avoid repeatedly cycling power while holding the throttle or brake.
Don't bypass a safety interlock as a first-line fix. A permanent bypass can allow drive activation when the stand is down, which creates a new hazard during mounting, parking, or loading. If the sensor is faulty, replace the failed component or have a technician diagnose the circuit. The electric scooter safety tips guide is useful for the broader checks that should accompany any no-start investigation.
Why this matters in real use
A commuter may assume the battery has failed after a wet stop outside a station. A rider in the US may blame a loose display connector after parking on a suburban driveway. In either case, the kickstand is part of the diagnostic path when the model uses an interlock.
The mechanical stand and the electronic sensor should agree every time. If the scooter starts only after you wiggle the stand, treat that as a fault, not a quirky operating procedure. Record the symptoms, avoid riding until the lockout behaves consistently, and use the manufacturer's wiring diagram or service support rather than joining sensor wires at random.
Choosing the Right Stand for Your Riding Style
For urban riding, I generally prefer a heavy-duty or adjustable electric scooter kickstand over the shortest basic side stand. City surfaces rarely stay perfectly flat. Pavement slopes toward drains, kerbs create abrupt transitions, and a quick stop may happen on paving stones rather than a workshop floor. The extra hardware is a worthwhile trade when it gives you a larger foot and more control over lean angle.
That recommendation isn't universal. A light recreational scooter used indoors or on smooth paths may need only a simple side stand. A heavy commuter used across London, Berlin, or other dense European cities benefits from stronger mounting hardware and a foot that won't disappear into a pavement joint. Riders covering mixed terrain in Australia or the US should give ground contact more weight in the decision than folded size alone.
Match the stand to the rider
Urban commuter: Choose a reinforced side stand with a broad foot, or an adjustable model if the scooter regularly parks on crowned or broken pavement. Keep the retracted profile clear of kerbs and folding hardware.
Recreational rider: A standard side stand can work when the scooter remains light and the parking surfaces are predictable. Spend attention on hinge quality and positive retraction rather than decorative finish.
Heavy-duty hauler: Use a strong centre or adjustable stand with a mounting plate designed for the frame. A tall, narrow arm may flex under the scooter's mass even if it appears substantial in a product photograph.
Speed and legality also shape the use case. In the UK, private e-scooters are currently illegal on public roads, pavements, cycle lanes, and public spaces. They may be used on private land with the landowner's permission, and government guidance treats them as motor vehicles under the Road Traffic Act 1988, with requirements involving insurance, a valid driving licence, registration, and MOT-related rules, as explained in the UK powered transporters guidance. Official rental trials follow separate conditions. The UK e-scooter rules state that legal trial use on public roads has a maximum speed of 15.5 mph, or 25 km/h, with no pavement or motorway use.
In Queensland, devices must be limited so they can't travel faster than 25 km/h, according to Queensland road safety guidance. Australian buyers should also check applicable supply and battery safety requirements. The Australian product safety guidance says lithium-ion-powered e-micromobility products must comply with a formal information standard or approved safety standard, including AS/NZS 60335.2.114:2023 for certain products.
Maintenance Tips for Long-Lasting Performance
A kickstand usually gives warning before it fails. The warning may be a new rattle, a hinge that no longer snaps into position, a wider lean angle, or a foot that rocks on the ground. Deal with those signs early. Waiting until the stand folds under load often means the mounting holes and frame have suffered as well.
Use a short inspection routine
- Check the fasteners: Hold the scooter steady and look for bolt heads that have backed out, washers that have shifted, or a bracket that moves against the frame.
- Test deployment: The arm should move smoothly and reach its full stop without a kick or excessive force.
- Inspect the foot: Replace a cracked, sharply worn, or badly bent foot rather than trying to compensate with a spacer.
- Look for corrosion: Clean road salt and moisture from steel parts, especially around the hinge and exposed threads.
- Listen closely: Squeaking can indicate dry pivots, while grinding suggests contamination or damaged surfaces.
Use a small amount of suitable lubricant on the pivot if the manufacturer permits it. Keep lubricant away from brake components, tyres, electrical connectors, and sensor faces. Wipe away excess so grit doesn't form an abrasive paste inside the hinge.
A loose stand may need only correct tightening, but a bent arm, stripped thread, broken spring, cracked bracket, or persistent wobble usually calls for replacement. Don't drill a new mounting hole in the frame without understanding what sits behind it. Battery cases, wiring, and structural members can make an improvised repair unsafe.
Storage matters too. If the scooter lives outside, park it with the stand on a firm surface and protect exposed metal from prolonged moisture. Before a longer ride, especially after transporting the scooter in a car or on public transport, deploy and retract the stand once. That quick check can catch a shifted bolt or damaged spring before the next stop.
Punk Ride LLC offers electric scooters designed with integrated kickstand hardware, and its warranty process includes kickstands among covered scooter parts. Visit Punk Ride LLC to compare its electric ride range and find a scooter setup that fits your commuting terrain and maintenance expectations.
Share:
Comfortable Commuter Bike: How to Choose the Right One
Electric Bike Used