You head out for work, prepare the bike, squeeze the tire, and it's dead flat. If you ride a rear hub motor e-bike, that moment is worse than a normal bike flat. It's not just rubber and air anymore. You've got motor wiring, axle hardware, and brake alignment to think about before you even touch a tire lever.
The good news is this job is still very doable at home. Most riders get stuck because generic bike guides skip the parts that matter on commuter e-bikes in the US and Australia. They show the easy bit. They don't show the connector that won't separate, the anti-rotation washers that fall out, or the tube that gets pinched on the way back in.
That matters more now because e-bike ownership keeps climbing, and maintenance is becoming part of everyday riding. One market projection says the global e-bike tire market could reach USD 17.5 billion by 2035, growing at a projected CAGR of 18.07% from 2026 to 2035 according to Market Research Future's e-bike tire market outlook. More bikes on the road means more riders dealing with flats, worn tread, and replacement tires as routine upkeep.
If you want a companion read for punctures and quick fixes, Punk Ride also has an e-bike tire repair guide. For this guide, the focus is the job often avoided. Full electric bike tire replacement on a hub-motor commuter bike, done carefully so you don't create a second problem while fixing the first.
Your Ride Is Grounded Now What
A flat on an electric bike always seems to happen when you're short on time. Commute starts in twenty minutes. Groceries are packed. Rain is coming. And now the rear tire is soft enough to fold under the rim.
That's when riders usually make the worst choices. They either force a rushed repair, or they keep inflating a tire that's already telling them it's done. On an e-bike, both moves can leave you stranded again fast.
The practical mindset is simple. Treat tire work like normal maintenance, not a disaster. If you ride daily, tire replacement will come up sooner than many other parts because tires wear with every mile, every curb hit, every pothole, and every underinflated ride. Once you accept that, the whole job gets less intimidating.
Shop advice: Slow hands beat strong hands. Most e-bike tire damage during DIY work happens because someone starts forcing parts before they understand how that wheel is held together.
For US and Australian commuters, this matters even more because the bikes tend to see hard urban use. Painted lane markings, broken pavement, heat, debris near gutters, and heavier rider loads all make tire care less optional than people expect. A lot of riders can handle the repair. They just need the e-bike-specific sequence.
When to Replace Your E-Bike Tires
Some tires fail all at once. More often, they give you plenty of warning before they become a problem. You just have to know what you're looking at.
One solid rule for commuters is not to wait for a full failure. According to Really Good Ebikes on e-bike tire lifespan, city e-bike tires typically last 1,000 to 3,000 miles, while touring tires can reach 4,000 miles depending on conditions and maintenance. That tells you something important. Tire replacement is ordinary upkeep, not a rare event.

The signs I tell riders to check first
Start with the tread and sidewalls. Those two areas tell you most of what you need to know.
- Flattened center tread: City riders often wear the middle first. If the tire looks squared off instead of rounded, handling starts to feel dull and grip drops.
- Cracks in the sidewall: Small surface cracking can turn into a real failure point, especially on bikes stored outdoors or ridden in heat.
- Frequent punctures: If you're getting repeat flats close together, the casing may be too worn to keep resisting debris.
- Cuts and embedded junk: Tiny glass shards and wire pieces hide in the tread and keep causing trouble until someone digs them out.
- Bulges or distorted spots: A tire that no longer sits evenly shouldn't be trusted.
A lot of the same visual logic applies to cars too. If you want a simple cross-check on the basics of when to get new tires, that guide gives a useful outside perspective on wear, cracking, and replacement timing.
The less obvious signs riders miss
Sometimes the tire still looks decent from a few feet away. Then the bike starts feeling off.
Watch for these ride symptoms:
| Symptom | What it often means |
|---|---|
| More flats than usual | Worn casing or debris left in the tire |
| Nervous cornering feel | Hardened or worn tread |
| Harsh ride over small bumps | Pressure issue or aging tire carcass |
| Tire loses air faster | Small puncture, valve issue, or failing tube |
| Sudden wobble after inflation | Bead not seated evenly or tire damage |
If you're not checking pressure regularly, do that before blaming the tire. Low pressure speeds up wear and makes punctures more likely. Punk Ride has a practical guide on inflating bike tires if you want to tighten up that part of your routine.
A worn tire doesn't always look dramatic. Often it just starts asking for more attention than it used to.
Gather Your Tools and the Right Tire
Bad tire jobs usually start before the wheel comes off. Someone begins with one lever, the wrong spanner, no pump gauge, and a replacement tire they haven't checked against the sidewall. Then the bike ends up half-disassembled while they search the garage.
Get everything on the floor first. That saves time and keeps you from rushing the fiddly parts.

What I'd lay out on the bench
You don't need a full workshop. You do need the right basics.
- Tire levers: Use proper plastic levers, not screwdrivers. Screwdrivers love to scar rims and pinch tubes.
- Pump with a gauge: You need controlled inflation, not guesswork.
- Correct spanners or sockets: Rear hub motor axle nuts are often larger than riders expect.
- Replacement tire: Match the exact size printed on your current sidewall.
- New tube if you're running tubes: Even if you plan to patch the old one, have a spare ready.
- Gloves and rags: Hub motor wheels tend to be dirtier around the axle and chain area.
- Small pick or tweezers: Handy for pulling glass or wire from the old tire.
- Patch kit as backup: Useful if your spare tube turns out faulty or gets pinched.
- A way to support the bike: A stand is great, but a careful upside-down setup can work if the display and controls are protected.
Choosing the replacement tire
This part matters more on an e-bike than on a light acoustic bike. Extra weight and motor assistance change what feels acceptable.
For commuter use, I usually tell riders to pick based on these trade-offs:
- Puncture resistance: Better for rough city streets, debris, and daily commuting.
- Rolling feel: Faster, lighter-feeling tires can be nice, but they usually ask for more care.
- Comfort: A slightly more forgiving tire helps on broken pavement and expansion joints.
- Load handling: Cargo, backpacks, child seats, and bigger riders all put more stress on the rear tire.
If your riding is mostly bike lane, sealed roads, and the occasional rough shoulder, a commuter-focused tire with decent puncture protection is the safest all-round choice. If you ride fast and want a more lively feel, you can go lighter, but be honest about how often you want to fix flats.
Practical rule: Choose the tire for the road you actually ride, not the road you wish you rode.
If you need a reference on fit and mounting basics, Punk Ride also has a guide on installing tires on rims. They also stock replacement tyres, tubes, valves, and related parts for matching different setups.
Two checks before you buy
Do these before ordering anything:
- Read the sidewall fully. That's where your current size lives.
- Check clearance on the bike. A tire that's technically the right diameter can still be a bad idea if it's much wider than stock.
Rear hub motor commuters don't leave a lot of room for mistakes. A too-wide tire can end up rubbing frame stays, mudguards, or chain guards, especially if the wheel isn't perfectly centered after reinstall.
Removing the Wheel Without Damaging Your Motor
Many individuals get nervous at this point, and fair enough. The risky part of electric bike tire replacement isn't usually the rubber. It's the wheel removal on a rear hub motor bike.
A key point from Magnum Bikes' e-bike tire change guide is that the most common point of failure in a DIY e-bike tire change is damaging the hub motor wiring or brake alignment. That's exactly what I see in the shop. Not ruined tires. Bent connectors, trapped cables, and wheels reinstalled crooked.

Start with the bike stable and powered down
Before you touch the rear axle:
- Turn the system off: You don't want the bike live while handling motor wiring.
- Remove the battery if your bike allows it: That keeps things simpler and safer.
- Shift to the smallest rear cog if your bike has gears: It gives you the most slack and makes reinstall easier.
- Support the bike properly: A work stand is ideal. If you flip the bike, protect the controls and display.
Then look at the axle area before loosening anything. Take a photo on your phone. Do the same for the motor cable routing and washer order. That one habit saves a lot of swearing later.
How to deal with the motor cable
Rear hub motor connectors usually separate cleanly, but only if you treat them gently. Don't twist the cable itself. Don't yank on the wire. Hold the connector bodies.
What you're looking for depends on the bike, but the principle stays the same:
- Find the connector point before the axle drops.
- Check for alignment marks.
- Pull the connector apart straight and carefully.
- Keep dirt away from the open ends.
If it doesn't want to move, stop and inspect it. Some connectors are snug and weather-sealed. That doesn't mean they should be forced.
If you pull on the wire instead of the connector body, you may finish the tire job and create an electrical fault at the same time.
Axle nuts, washers, and dropout order
Hub motor axles aren't like a quick-release front wheel. They usually use nuts, washers, and anti-rotation hardware that need to go back exactly as they came off.
I like to remove and place parts in order on a clean rag from left to right. That way nothing gets mixed up.
Watch for:
| Part | Why it matters |
|---|---|
| Axle nuts | Hold the wheel securely in the dropouts |
| Torque or anti-rotation washers | Help stop the axle from twisting under motor load |
| Spacers | Keep the wheel positioned correctly |
| Chain tension or alignment pieces | Present on some setups and easy to misplace |
If your bike has a derailleur, ease the wheel out while moving the derailleur body back. If it has disc brakes, guide the rotor out cleanly from the caliper. Don't let the wheel hang by the motor cable. By this stage, the connector should already be separated.
Here's a good visual walkthrough to compare with your own bike before you start forcing anything:
What goes wrong most often
The recurring mistakes are boringly consistent:
- People loosen one side only: Then the axle binds in the dropout.
- They forget washer orientation: The wheel goes back in crooked.
- They tug the cable while lowering the wheel: That stresses the connector or internal wiring.
- They reinstall without checking brake position: Rotor rub starts immediately.
Once the wheel is out, set it flat with the cassette side or rotor side protected as needed. Don't rest the bike where the rear brake lever can be squeezed if the wheel is removed, especially on some brake setups where pad spacing can become awkward.
Rear wheel centering matters
When the job is finished, the wheel must sit square in the frame. If it's not centered, the bike may track oddly, the tire can rub, and the brake rotor may scrape every revolution.
This is the detail generic guides skip, and it's the one that separates a proper repair from a “good enough” one. On rear hub motor bikes, careful reinstallation is part of the repair, not an afterthought.
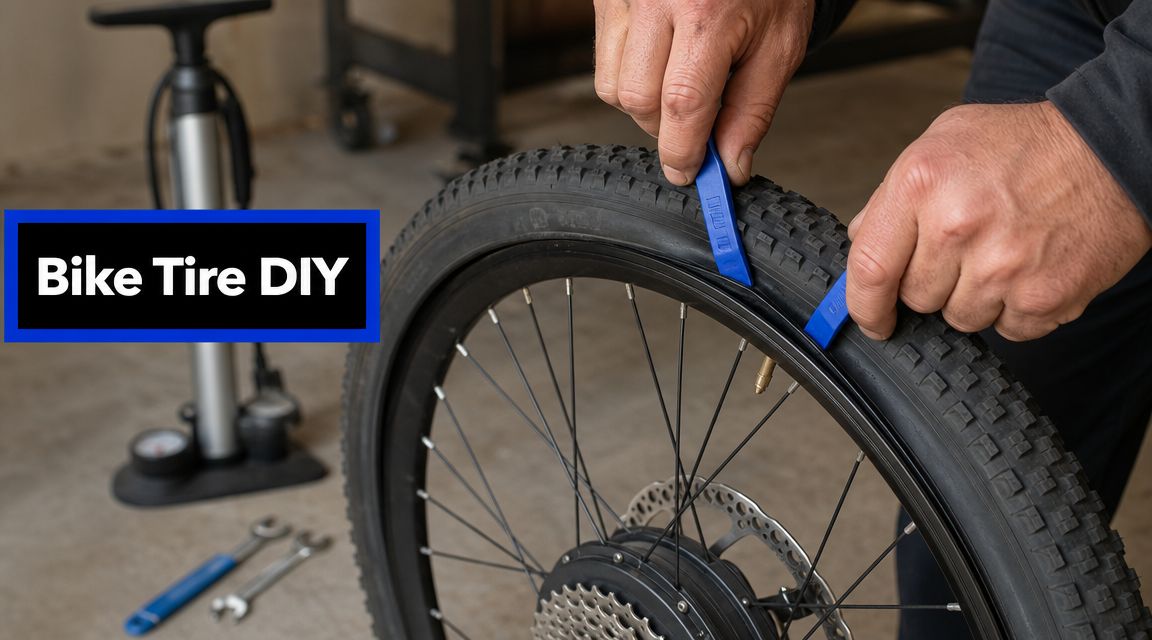
The Tire Swap and Critical Safety Checks
With the wheel on the bench, the job starts looking familiar again. This part feels more like standard bike work, but there are still a couple of ways to ruin an otherwise good repair.
The safest sequence comes from established repair guides. Fully deflate the tire, break only one bead first, remove the tube, inspect the tire interior and rim tape, then fit the new tube with just enough air to give it shape. Victrip's DIY electric bike tire guide stresses that slightly inflating the tube before installation helps prevent pinch flats, and that's exactly right.

Breaking the bead and getting the old tube out
Start by letting all the air out. I mean all of it. Then squeeze the tire sidewalls inward so the bead drops into the rim's center channel. That creates slack and makes the rest easier.
A clean sequence looks like this:
- Deflate completely.
- Break one bead only. You usually don't need to remove both sides of the tire.
- Use levers carefully. Start opposite the valve if possible.
- Pull the tube out. Leave the second bead in place unless you're changing the tire too.
If the tire is stubborn, work slowly around the rim instead of trying to win with brute force in one spot.
Inspect before you install anything new
This is the step rushed riders skip, and it's why they come back with another flat the same day.
Check three places:
- Inside the tire casing: Run your fingers carefully along the inside and look for embedded glass, wire, thorns, or sharp edges.
- Rim tape or rim strip: If it's damaged or out of place, the new tube can fail against the spoke holes or rim bed.
- The tire bead: Look for cuts, fraying, or distortion.
A new tube in a dirty tire is just a delayed flat.
If you're replacing the whole tire, check the directional arrow on the sidewall before mounting it. It's an easy thing to get wrong once the wheel is lying flat.
Fitting the new tube without pinching it
This is the part that separates a one-and-done repair from having to do the whole job twice.
Use this order:
- Put one side of the tire onto the rim.
- Add a little air to the new tube so it holds its round shape.
- Insert the valve straight through the rim hole.
- Tuck the tube fully inside the tire.
- Work the second bead onto the rim mostly by hand.
- Use a lever only for the last stubborn section if you absolutely need it.
That “slightly inflated” detail matters because a completely limp tube folds easily and gets trapped under the bead. Once you trap it and inflate, you get the classic fresh pinch flat.
Final inflation and bead check
Inflate slowly, not all at once. Watch the line near the bead on both sides of the tire as pressure comes up. It should sit evenly all the way around.
Stop if you see:
| Problem | What it usually means |
|---|---|
| Bulge in one spot | Tube trapped or bead not seated |
| Tire wobble during spin | Uneven bead seating or tire issue |
| Hiss after inflation | Pinched tube, puncture, or valve problem |
| Bead low on one side | Tire needs to be massaged into position before full pressure |
Once the wheel looks right, spin it by hand before reinstalling. You want a tire that runs true and doesn't bulge.
Reinstall and run the non-negotiable checks
When the wheel goes back into the frame, reverse the removal process carefully. Refit the axle hardware in the same order, seat the wheel squarely in the dropouts, reconnect the motor cable properly, and make sure the cable routing matches how it was before.
Then do these checks before riding:
- Spin the wheel: Listen for brake rub and watch tire clearance.
- Check the brake rotor alignment: It should pass cleanly through the caliper.
- Confirm axle security: The wheel should sit fully and evenly in the frame.
- Inspect the motor connector: Fully seated, correctly aligned, no strained wire.
- Do a short slow test ride: Start easy and listen.
If anything feels off, stop and fix it before the commute. E-bike rear wheels don't reward “close enough.”
E-Bike Tire FAQs and Maintenance Tips
A few questions come up every time someone finishes their first electric bike tire replacement. These are the ones worth clearing up before the next flat.
Tubeless or tubes for a commuter e-bike
For most commuter riders, it's a trade-off, not a universal upgrade. According to Aventon's guide to fixing flat e-bike tires, tubeless setups resist small punctures better, while most e-bikes still use tubes and tube repairs are often simpler at the roadside without sealant or extra setup.
That matches real workshop experience. Tubeless can be great if you stay on top of sealant upkeep and want better resistance to little punctures. Tubes are easier for many riders because the repair process is familiar, cleaner, and usually less fussy on a commute.
Why do I keep getting flats in the same wheel
Usually one of four things is happening:
- Debris is still inside the tire
- The rim tape is damaged
- The tube got pinched during install
- Pressure has been too low for your riding conditions
Recurring flats are often less about bad luck and more about something small being missed.
Where do I find the tire size
Look at the tire sidewall. That's your starting point for diameter and width. Match that before buying anything. If you want to experiment with a different width, only do it after checking frame and mudguard clearance.
Any simple maintenance habits that actually help
Yes. The basics work.
- Check pressure regularly: Underinflation is hard on tires and tubes.
- Inspect after rough rides: Pull out glass and sharp debris before it works deeper.
- Watch the rear tire closely: It usually takes more abuse on commuter e-bikes.
- Don't ignore small cracks: Sidewall aging doesn't get better with time.
Oddly enough, small-wheel maintenance habits carry over across a lot of personal transport gear. Even something like this Golf push cart tire guide is a reminder that pressure, wear checks, and proper fit matter on any wheel that has to roll reliably.
Keep a spare tube, two levers, and a compact pump on the bike. The best flat repair kit is the one you actually remembered to bring.
If you'd rather get your parts sorted before the next roadside headache, Punk Ride LLC carries electric ride gear and publishes practical maintenance advice for e-bike owners who want to handle more of these repairs themselves.
Share:
Electric Bike Hunting 2026: Your Ultimate Guide & Gear
Electric Bike Tire Replacement: Your Easy Guide