You're ready to leave, but the battery key spins without releasing anything. Or the pack clicks into place, then shifts when you give it a gentle pull. Don't squeeze in the commute and deal with it later. Electric bike battery lock replacement starts with identifying what failed, then deciding whether the battery is safe to handle at all.
Know When the Lock Needs Replacing
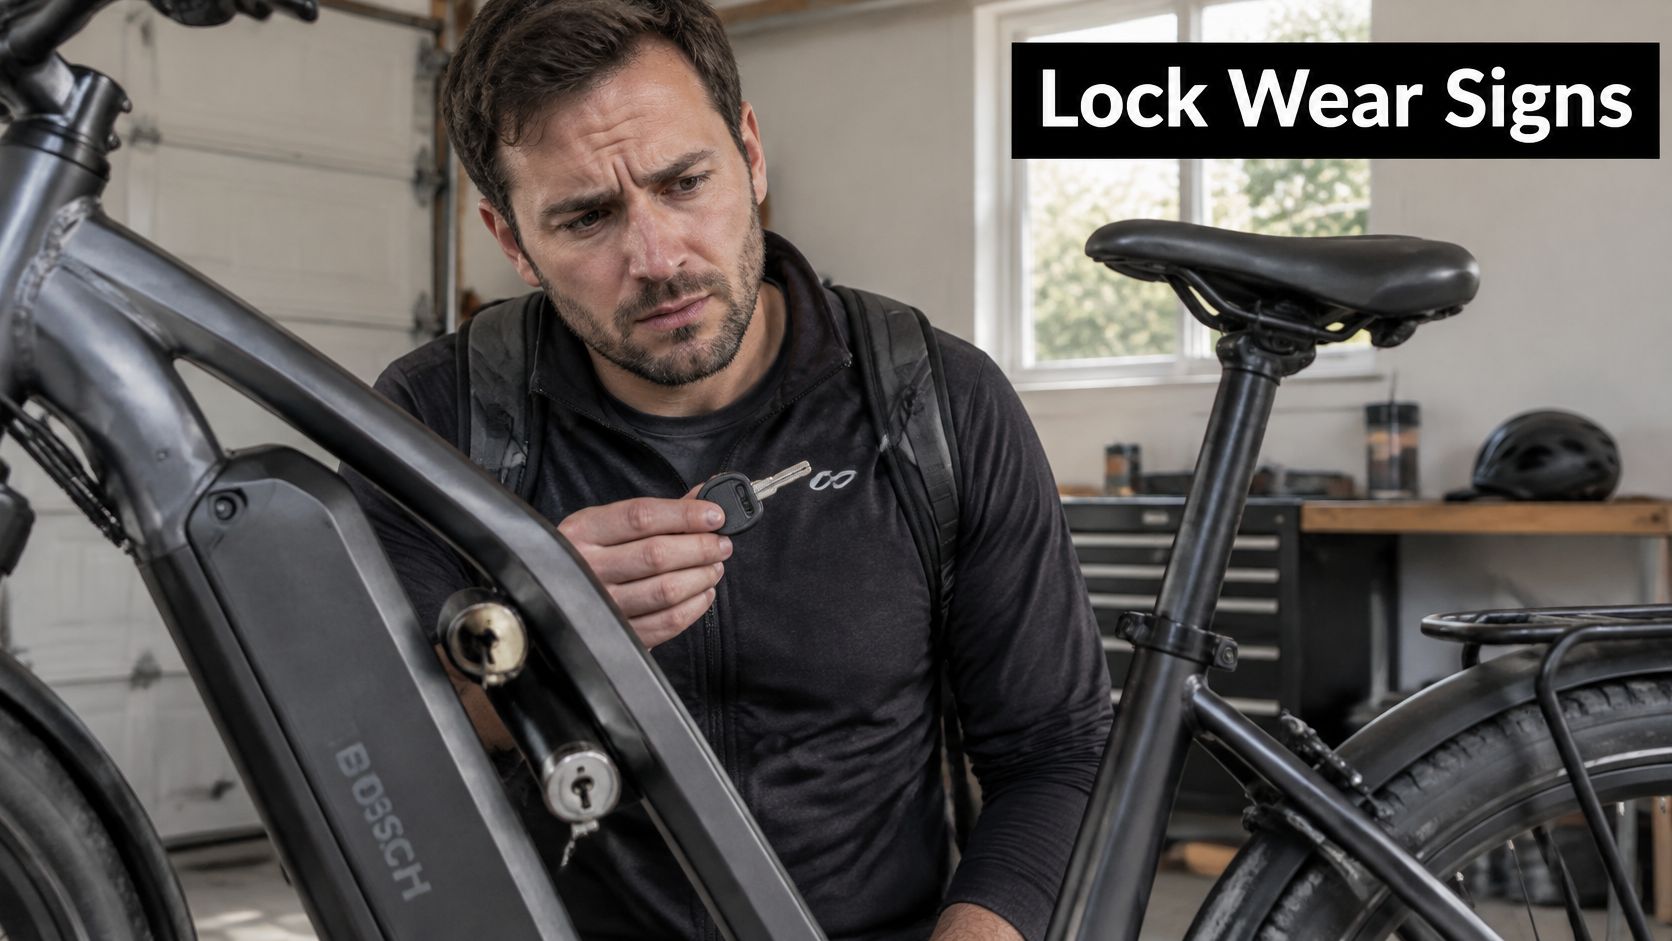
A freely turning key doesn't automatically mean the whole battery needs replacing. The fault might be in the cylinder, the small arm behind it, or the latch that holds the pack. If the lock body moves with the key, its mounting hardware also needs inspection.
Start with the least invasive check. With the bike switched off, compare the usual key with an undamaged spare, if available. A spare that works normally points towards a key problem rather than a failed assembly. Don't force a bent key or use pliers to turn it.
Separate the Symptoms
- Key trouble: The spare operates correctly, but the everyday key sticks or won't enter fully.
- Cylinder trouble: The barrel binds, feels damaged, or rotates without its usual resistance.
- Latch trouble: The key moves, but the retaining mechanism doesn't follow.
- Seating trouble: The pack hasn't reached its intended position, so the latch can't engage.
- Battery damage: The enclosure has changed shape or suffered damage, making this more than a lock repair.
Battery locks serve a mechanical security purpose. European patent EP2581296A1 describes a battery holder secured through the seat-tube closure, while US9611003B1 describes a key-operated latch engaging the battery body to prevent removal when locked, as outlined in the battery-holder patent documentation.
Practical rule: A working display doesn't prove the battery is securely retained.
An accessible, manufacturer-documented external lock can be an owner-serviceable job. A trapped pack, inaccessible retaining hardware, or work requiring entry into the battery enclosure belongs with a qualified technician. Across the UK, EU, US, and Australia, follow the exact model's documentation, not a video showing a similar-looking case.
Prepare the Bike and Battery Safely
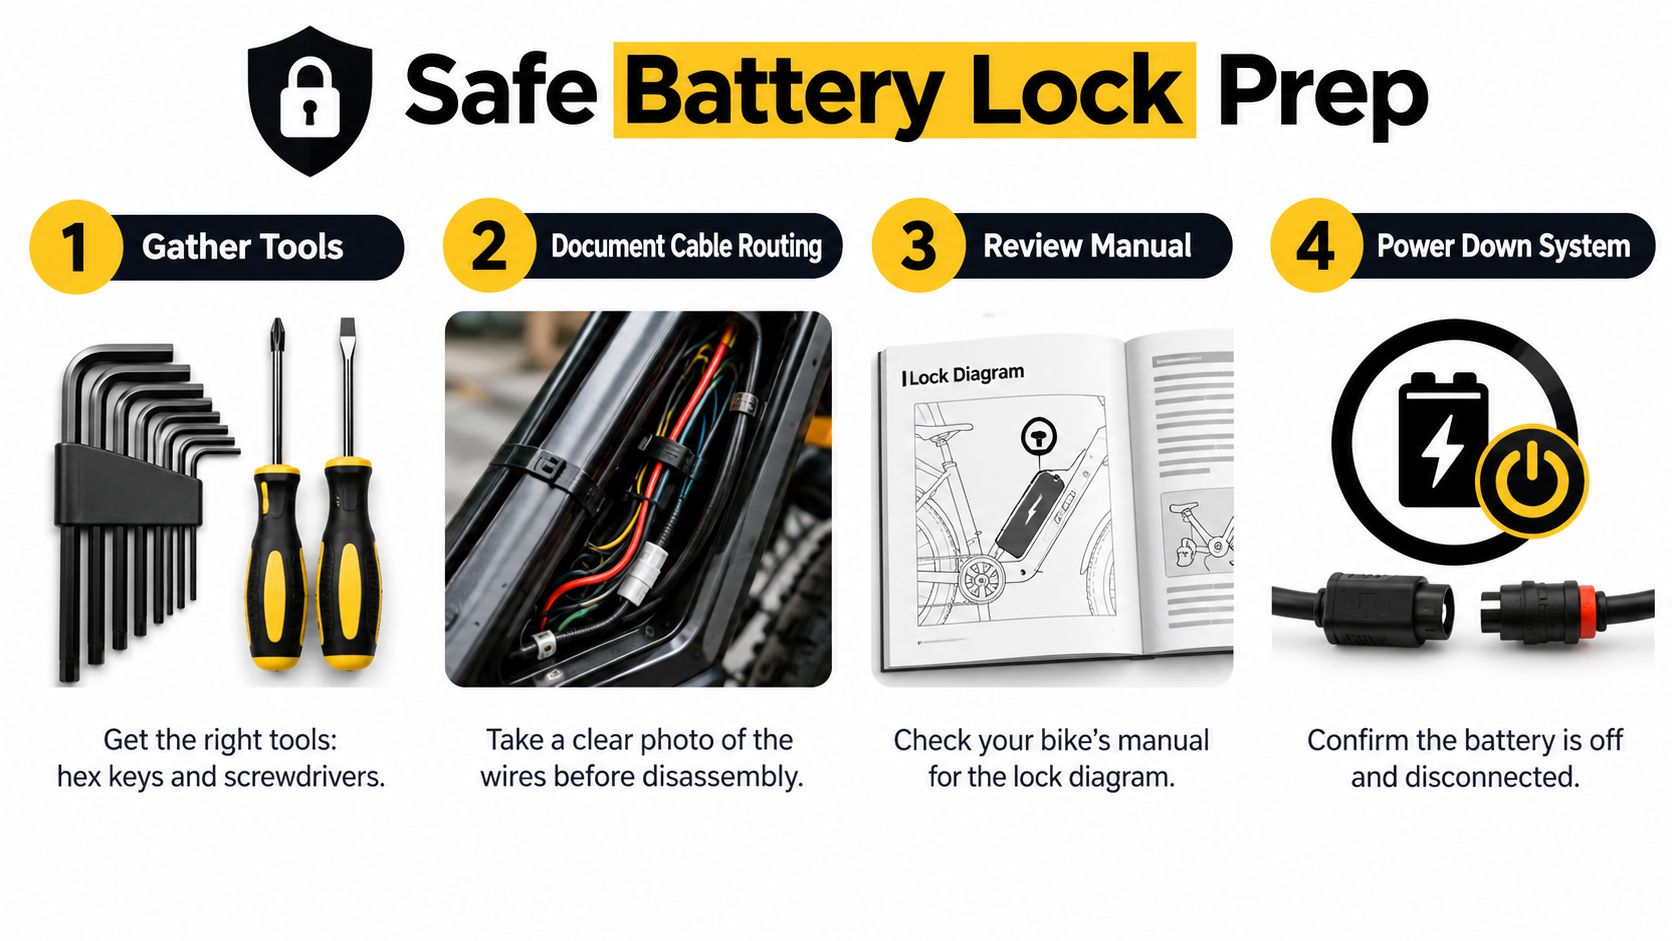
Set the bike somewhere stable, dry, and well lit before reaching for tools. Unplug the charger and power the system down according to the manual. A switched-off battery still contains stored energy, so keep metal tools away from its terminals.
Build a Useful Workbench Checklist
- Documentation: Find the lock diagram, battery-removal instructions, approved replacement details, and fastener specifications.
- Tools: Gather correctly fitting hex keys and screwdrivers, a torch, a parts tray, and any torque tool the manufacturer specifies.
- Photographs: Capture the lock position, latch orientation, cable routing, and fastener locations before disturbing anything.
- Battery identification: Photograph the pack label and charger label while they're readable.
Use this preparation checklist before opening access covers.
Remove the battery only if it appears undamaged and releases through the documented procedure. Support its weight rather than letting it drop out of the mount. Place the removed pack on a stable, nonflammable surface, away from loose screws and conductive clutter.
If you're unfamiliar with the arrangement, review the practical considerations for an electric bike with a removable battery. Removable doesn't mean every surrounding cover or lock component is intended for owner disassembly.
Inspect Without Probing
Look for swelling, leaks, impact damage, water intrusion, melted connectors, or unusual heat. Inspect visible terminals for corrosion, looseness, arcing marks, and heat discolouration. Don't insert tools into connectors, bend contacts, or open the enclosure to investigate.
Stop work when any warning sign appears. Don't charge or refit a suspect pack; ask a qualified battery technician for safe handling advice.
The reason for caution isn't that lock replacement causes fires. UK government fire reporting recorded 121 e-bike or e-scooter fires from January 2017 through December 2021, 93 in 2022, and 199 in 2023, with batteries or generators identified as the ignition source in 91% of recorded incidents. Treat the pack as an electrical energy source, even during an apparently mechanical repair.
Match the Correct Replacement Part
Buy the component that has failed, not the biggest assembly available. A lost key and a broken battery mount are different purchasing decisions. Replacing more parts than necessary adds work without resolving uncertainty about compatibility.
Record the bicycle's exact model, battery part number and generation, nominal voltage, mounting interface, connector arrangement and polarity, and key-cylinder format. Include the charger specification. Establish whether the lock operates a mechanical latch alone or also actuates an electrical interlock, a switch involved in system operation.
Battery Lock Replacement Options
| Replacement part | Best suited to | Verify before fitting |
|---|---|---|
| Replacement key | Missing or damaged key with a sound lock | Key code and supported cylinder |
| Lock cylinder | Failed barrel with an intact latch and mount | Barrel dimensions, retaining method, cam orientation |
| Latch assembly | Damaged or disconnected retaining mechanism | Travel, engagement geometry, mounting position |
| Complete mount | Damaged cradle or integrated lock support | Battery generation, connector arrangement, frame attachment |
| Complete battery pack | A separate battery replacement decision | Manufacturer approval, electrical compatibility, charger requirements |
The cam is the small arm behind the cylinder that moves the latch. A barrel can match the housing diameter yet have the wrong cam position or travel. That makes it unsuitable, however convincing the product photograph looks.
Physical fit is a screening check, not proof of compatibility.
Keep Mechanical and Electrical Matching Separate
For a genuine lock-only repair, there's no reason to change the pack's voltage or electrical connections. If the proposed solution includes a different battery or wired mount, expand the compatibility check before ordering.
Matching nominal voltage alone doesn't establish compatibility with the controller, charger, connector, or battery-management system, the electronics that supervise the pack. UL's e-mobility safety guidance recommends manufacturer-approved batteries and chargers evaluated to applicable safety standards, including UL 2849 or UL 2272, as appropriate to the device. Those references aren't interchangeable approval labels for every product.
For a separate electronic-fob problem, Quick Keys' guide to fix a dead key fob provides related troubleshooting context. It isn't an e-bike compatibility reference or a substitute for mechanical lock instructions.
UK and EU owners should check the manufacturer's regional parts documentation. US and Australian owners should do the same for their local-market model rather than assuming an overseas listing covers the same battery generation. Ask for written compatibility confirmation when a part number is unclear.
Remove and Install the Lock
Proceed only when the pack has passed the preliminary inspection, the replacement is confirmed, and the manufacturer permits access to the lock components. This is a workflow for an accessible mechanism, not a method for defeating a locked battery.
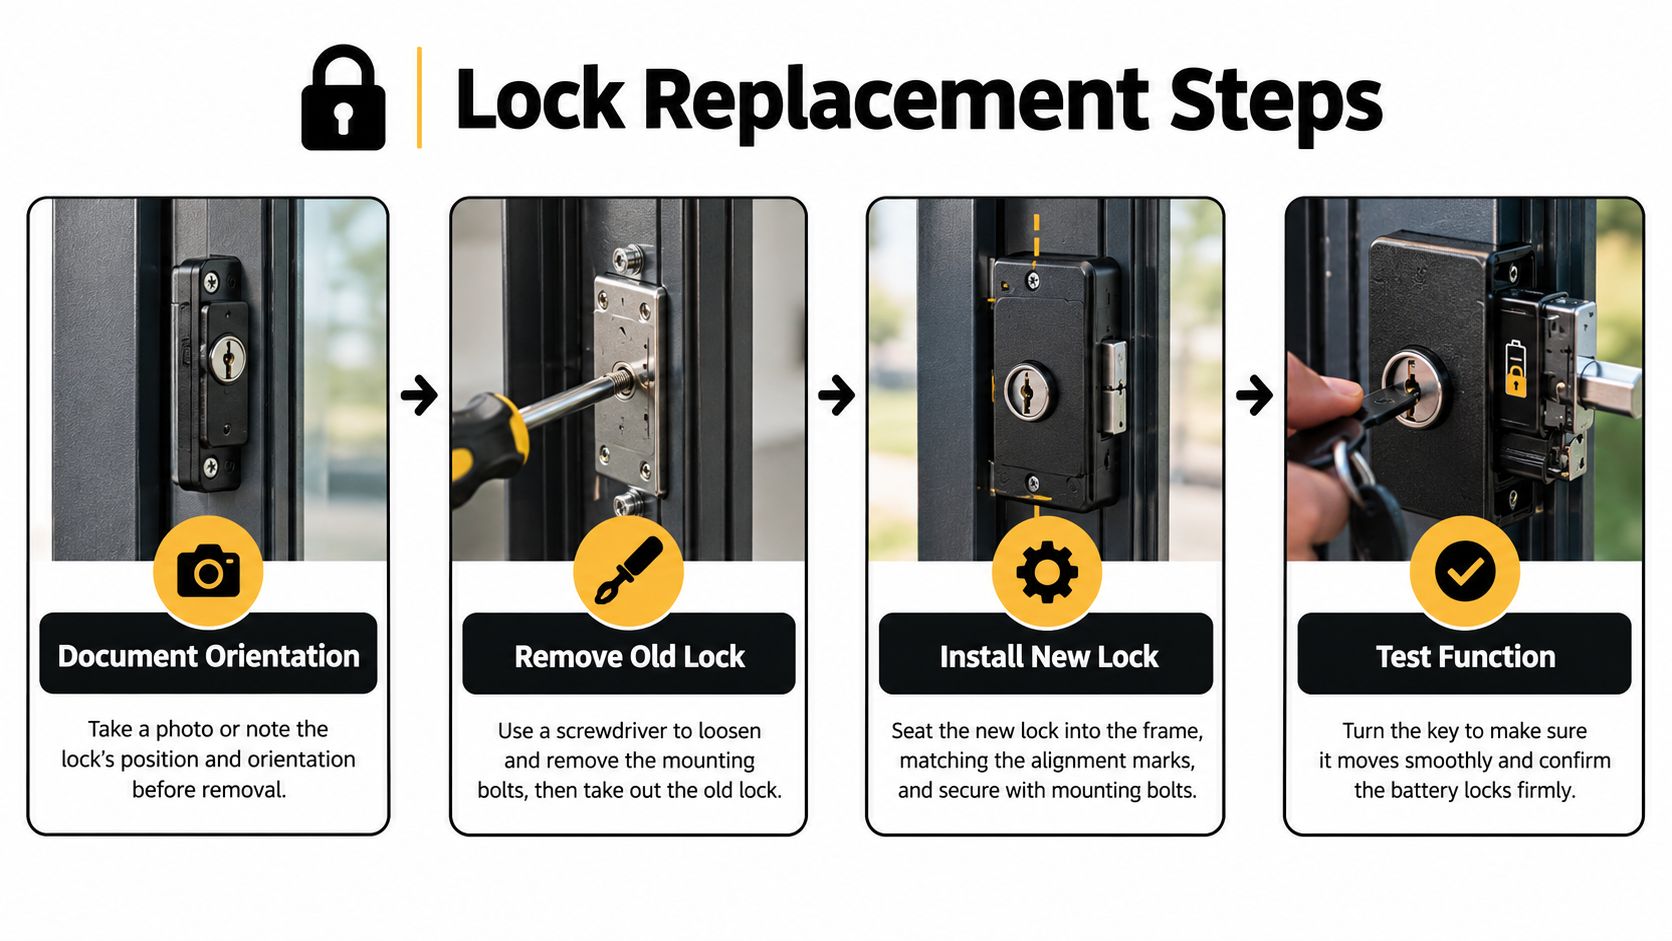
The graphic below summarises the mechanical sequence; the model's service instructions determine the actual hardware and access points.
Document and Support the Assembly
Compare the existing arrangement with your photographs before loosening anything. Note the key position, the direction the cam faces, and which surfaces locate the cylinder. Support the mount or external lock assembly so its weight won't pull on wiring when a fastener comes out.
Keep screws and clips grouped by their original location. Don't assume similar-looking screws have the same length or belong in interchangeable holes. If access requires opening the cell-containing battery enclosure, stop and use a qualified repairer.
Remove Only the Specified Hardware
Use the correct driver and remove the retaining hardware identified in the manual. Lift away an approved access cover without levering against the battery case. The cylinder or latch should release through its intended service arrangement.
If it won't move, check for an overlooked retaining clip, concealed fastener, or incorrect key position. Resistance isn't permission to pull harder. If a documented electrical connector must be disconnected, handle its housing and release catch, never tug the wires.
Don't drill the lock near the pack, short terminals, bypass an interlock, or solder across terminals to accommodate a nonmatching part. A generic bicycle cable lock can't substitute for the integrated mechanism that retains the battery.
Position the Replacement Before Tightening
Compare old and new components side by side. Transfer only the cam, bracket, spacer, or other hardware the manufacturer specifies. Keep the original orientation visible in your photographs.
Dry-position the replacement before final tightening. For example, a barrel may enter the opening perfectly while its cam points away from the latch. Another mismatch may let the key reach its stop while leaving the latch partly open. Neither condition can be corrected safely by forcing the pack into place.
The following video can provide visual context, but compare any demonstrated arrangement with your own service documentation.
Reassemble Without Trapping Wires
Start retaining fasteners by hand so the assembly locates naturally. Tighten using the manufacturer's specified method and torque, rather than choosing a setting from an unrelated bike. Don't use extra tightening force to pull a misaligned cylinder into its opening.
Route cables exactly as documented, clear of the latch path and cover edges. Reconnect only approved connections that were legitimately disconnected, checking orientation, polarity where applicable, and full seating without forcing them.
Refit access covers as directed before powered testing. Return the battery to its mount only after the unloaded mechanism moves freely and the assembly sits correctly. Don't lubricate, file, or bend a new component to make an unverified fit seem acceptable.
Test the Lock Before Riding
Successful key movement isn't a successful repair. You need to establish that the latch travels correctly, the battery stays retained, and the electrical system behaves normally after reassembly.
Start with the battery removed. Operate the key through its intended travel and watch the accessible mechanism. Check that the latch reaches its locked and released positions without binding, and that the cylinder stays fixed in its housing.
Validate in Stages
- Unloaded operation: Confirm the cam drives the latch rather than rotating independently.
- Insertion and removal: Fit and release the battery using the normal procedure. It shouldn't require a shove or a change in technique.
- Retention: Lock the seated pack and apply gentle manual pressure in its removal direction. Don't use violent shaking as a test.
- Connector inspection: Check visible seating and ensure no wire has entered a joint, rail, or latch path.
- Low-load operation: Secure the bike with the driven wheel clear of the ground, following the manufacturer's testing procedure. Keep hands, clothing, and tools away from moving parts.
Don't perform the raised-wheel test unless you can support the bike securely. A suitable repair stand and a clear working area matter more than rushing to prove the motor works.
Ride-readiness check: The battery should stay located without you holding it, wedging it, or relying on a strap.
After a satisfactory stationary test, take a short ride somewhere you can stop safely. Watch for power cut-outs, abnormal noises, rattling, or signs of connector heating. Stop immediately if anything changes; switch off before inspecting, and don't touch suspect contacts.
Keep a brief before-and-after record: original symptom, fitted part number, key action, latch engagement, and observed pack movement. Unexpected release, recurring looseness, or electrical interruption means the bike stays out of service pending a qualified inspection.
Fix Common Lock Replacement Problems
Troubleshoot the symptom rather than repeatedly loosening and retightening everything. Start with the replacement part number and your original photographs. A new component can be wrong even when it came with keys and fits through the opening.
Read the Mechanical Clues
| Symptom | Checks to make |
|---|---|
| Key won't turn | Confirm the supplied key and code; inspect for visible obstruction and assembly pressure |
| Cylinder turns without moving the latch | Compare cam engagement, orientation, and specified retaining components |
| Latch remains loose | Inspect retaining fasteners and mounting surfaces for damage |
| Battery won't seat | Check housing alignment, latch position, and trapped cable routing |
| Lock releases unexpectedly | Stop riding; verify full latch engagement and exact part compatibility |
A key that becomes stiff only after tightening suggests an alignment or assembly problem worth investigating. Looseness that returns despite correct assembly warrants inspection of the supporting housing, not progressively harder tightening.
Replace an incorrectly keyed or generic nonmatching part. Don't file the cam, elongate mounting holes, or reshape the battery enclosure to rescue the purchase.
Recognise When Troubleshooting Must Stop
A swollen or damaged pack, abnormal heat, water exposure, melted wiring, or a housing that no longer aligns safely isn't an adjustment problem. Keep the bike out of use and seek qualified advice. The broader electric bike repair guidance can help you separate surrounding bike faults from work requiring battery expertise.
Check the exact battery and charger models against relevant manufacturer notices and local recall information. In 2025, the UK government's battery-safety research announcement reported 21 product recalls and 29 product-safety reports involving unsafe or non-compliant e-bikes and e-scooters since 2022.
A replacement lock can restore access control and retention. It cannot make a recalled, damaged, modified, or electrically incompatible battery safe. Don't let a smooth-turning key obscure that distinction.
Complete the Final Safety Check
Ride only with the confirmed part fitted, smooth key operation, full latch engagement, and a firmly seated battery. Wiring must be unobstructed, and the low-load test must show no warnings, cut-outs, or heating.
Choose Repair Support When Needed
- Stop for uncertain access: Consult the manufacturer, authorised dealer, or qualified battery technician if the integrated part is unavailable or enclosure access is required.
- Follow regional guidance: UK, US, and Australian riders should check local manufacturer support and recall notices.
The EU battery-replaceability framework requires light-means-of-transport batteries to be removable and replaceable by an independent professional, with replacements available for at least five years after the final model unit is placed on the market. That isn't permission to rebuild a pack at home.
For separate whole-bike security, consult the best lock for an electric bike guide. Correct retention matters, but battery health remains a separate safety decision.
Punk Ride LLC offers a curated selection of electric bikes and scooters alongside practical ownership guides. Visit Punk Ride LLC to explore electric rides and maintenance advice, and keep your bike and battery model details handy when checking replacement-part compatibility.