


You're halfway through a wet commute when the front wheel clips a kerb edge. There's a sharp knock, the steering turns vague, and suddenly you're walking with a flat. That's usually when a solid-tire electric scooter starts looking tempting, but avoiding punctures means accepting other compromises.
For UK and EU riders, the useful question isn't which tire is best. It's which compromise suits your route: puncture risk, vibration, grip, range or repair work. Start with the ground you ride over, not the toughest-looking tread in the shop.
Solid, Pneumatic and Tubeless Tires at a Glance
A kerb strike can pinch an inner tube between the tire and rim, especially when pressure is low. Replacing that tube with solid rubber removes that particular failure, but it doesn't make the impact disappear. More of the knock reaches your hands, the frame and the battery mounting points.
Electric scooter tire types compared
| Tire type | Puncture risk | Ride comfort | Rolling resistance | Upkeep |
|---|---|---|---|---|
| Solid (rubber or polyurethane) | None from nails or glass | Firmest, passes more bumps | Highest, costs some range | Wear checks only |
| Pneumatic with inner tube | Moderate, pinch flats from kerbs | Softest on rough roads | Lowest when at rated pressure | Pressure checks, patch or replace tube |
| Tubeless pneumatic | Lower, sealant seals small holes | Soft, close to tubed pneumatic | Low, similar to tubed | Sealant top-ups and pressure checks |
| Air-chambered or airless design | Very low for non-pressurised designs | Between solid and pneumatic | Mid to high across different constructions | Wear checks and occasional cleaning |
These are practical comparisons between broadly similar tires, not guaranteed rankings across every compound and casing. A well-made tire can outperform a poor example of another type.
The chart below summarises the main choices.
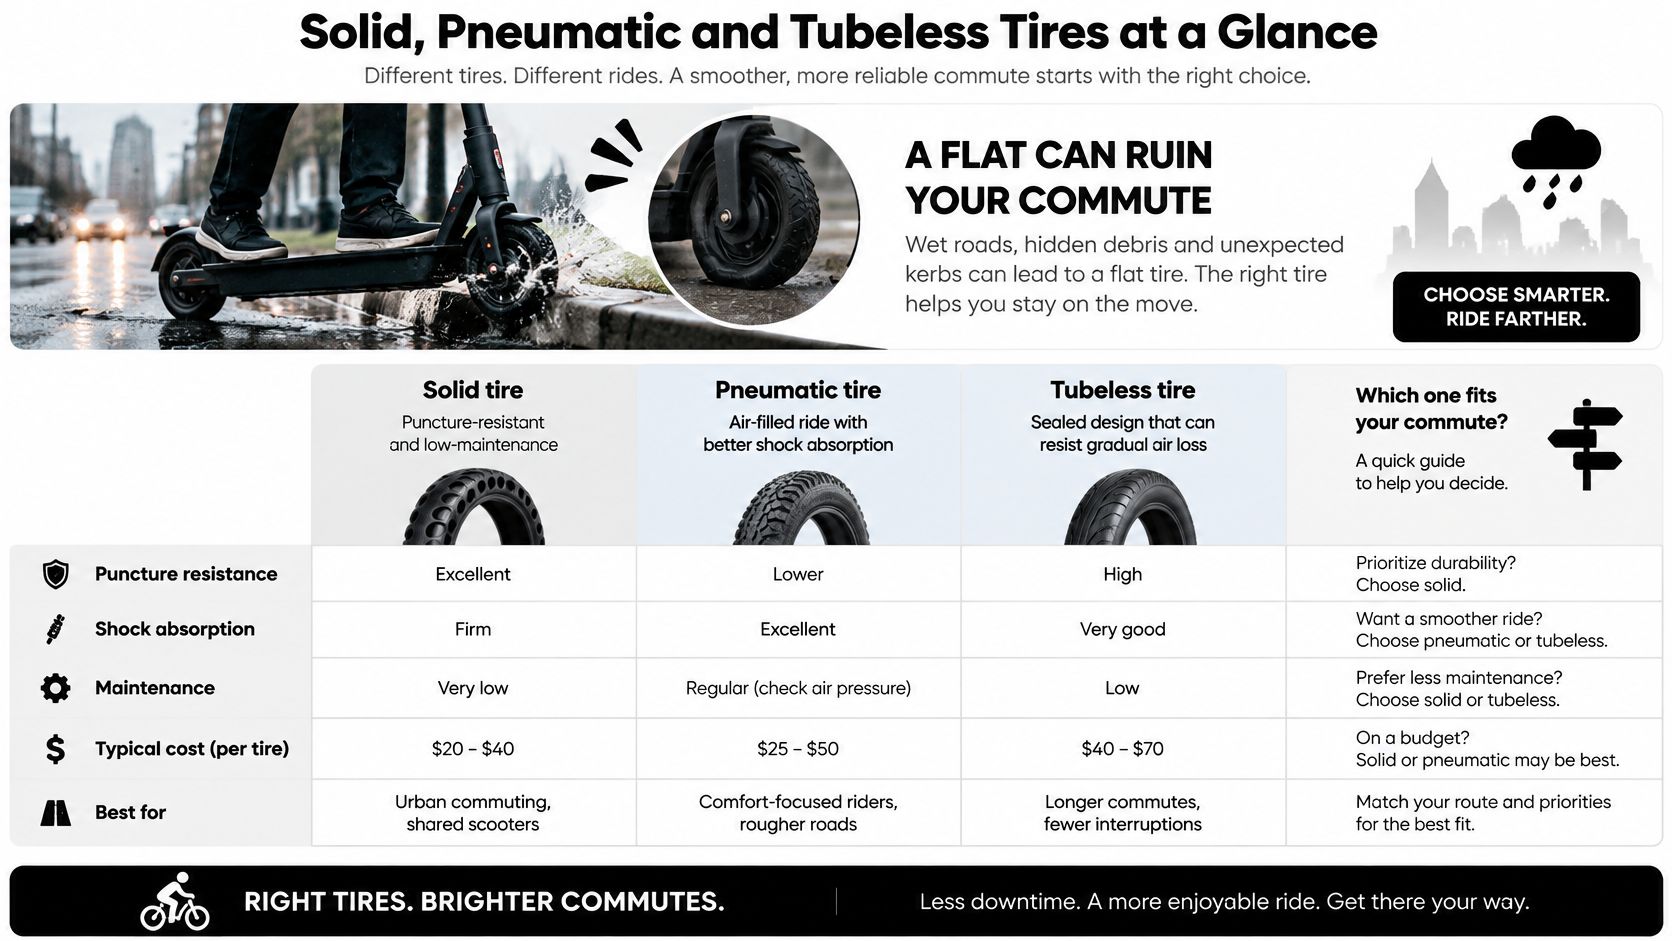
What those trade-offs feel like
Solid tires suit riders who value freedom from flats above cushioning. Nails and glass won't release any air, but cuts, missing chunks and loose fit still matter. Low maintenance isn't the same as no inspection.
Tubed pneumatic tires use a replaceable inner tube. They're forgiving over broken tarmac, but a hard kerb strike can damage the tube even without anything piercing the tread. Carrying a spare tube helps only if you also have the tools and access needed to remove the wheel.
Tubeless tires seal against a compatible rim. With suitable sealant, small tread punctures may close without a roadside repair, but a torn sidewall or damaged bead won't reliably seal.
Be careful with air-chambered terminology. A moulded honeycomb tire contains unpressurised cavities, while some manufacturers use air-chambered to describe an inflatable construction. Check the actual design rather than assuming the label means puncture-proof.
A peer-reviewed scooter vibration study compared pneumatic and airless tires on asphalt and brick pavement and examined vibration-related safety-lock failure. That makes whole-scooter condition relevant, not just whether the tire holds air.
Practical rule: Ask how often you cross broken ground, and how far you'd have to walk to reach a repair shop.
Matching Tire Size and Fit to Your Scooter
Wheel sizes and what they suit
| Wheel size | Typical scooter | Best for | Trade-off |
|---|---|---|---|
| 6.5 in | Compact folding scooters | Smooth, short routes | Limited cushioning and obstacle clearance |
| 8.5 in | Lightweight commuter scooters | Smooth urban streets and bike lanes | Absorbs less bump energy than a comparable 10 in setup |
| 10 in | Mid-size commuter and performance scooters | Mixed city roads and cycle paths | Heavier and bulkier, needs more folding clearance |
| 10 in fat tyre (wide) | Fat tyre scooters | Gravel, potholed roads and light trails | Adds weight and potentially rolling resistance |
| 11 in or larger | Off-road scooters | Rough ground and suitable trails | Bulky, check frame clearance carefully |
Treat these as shopping categories, not conversion permissions. A larger wheel approaches an obstacle at a shallower angle, but fitting one can alter mudguard clearance, brake alignment and handling. Bigger wheels don't make riding into kerbs sensible.
Check fit in this order
- Read the sidewall. Copy the complete size marking, including width and any rim designation. Similar-looking inch markings aren't proof of interchangeable beads.
- Measure the fitted tire's outside diameter and width. These measurements help identify clearance problems, but they don't replace the manufacturer's rim specification.
- Inspect fork and frame clearance. Check the mudguard, brake hardware and motor cable too. Allow for movement under load, not just a stationary wheel.
- Confirm the tire's approved rim-width range and bead-seat diameter. Never stretch a tire onto a rim because its overall diameter looks close.
- Check every load limit. Include the rider, bag and shopping, and obey the lowest applicable vehicle, wheel or tire rating.
Our specified scooter has a maximum load of 50 kg. That isn't a range-wide allowance or permission to increase capacity by fitting a stronger tire.
The guide to reading e-bike tire sizes helps explain why the complete marking matters, although scooter compatibility still needs model-specific confirmation.
A tire can be the right apparent size and still be the wrong replacement. Match the manufacturer's specification before buying.
How Tire Choice Changes Range and Ride Feel
Rolling resistance is the drag a tire creates as it rolls, and the motor must use battery energy to overcome it. Tire construction and inflation therefore affect range, even when the battery and route stay the same.
In dynamometer coast-down testing, scooter tires produced rolling-resistance coefficients approximately 3.5 to 6 times higher than a 700×32C bicycle tire, according to the Design Society tire-performance paper. The testing summary also reports 8.1 to 23 N of rolling-resistance force across nine common scooter tires at a total vehicle-and-rider mass of 90 kg, with coefficients ranging from 0.007 to 0.26.
What the testing means on a commute
Within comparable constructions, solid inserts generally created more resistance than pneumatic tires at their rated pressure. Reducing pneumatic pressure increased resistance further. That supports choosing a properly inflated air tire when efficiency matters, but it doesn't justify promising a fixed extra distance from a tire swap.
Say your permitted route is about 10 km each way, with repeated junction stops and a climb home. That's a hypothetical route, not a range test. An underinflated tire adds another demand on the motor while acceleration and climbing already require energy.
The useful distinction is between comfort from appropriate compliance and softness caused by insufficient pressure. The first is a design benefit; the second can bring drag, unstable handling and impact damage.
Don't buy a larger battery to compensate for a tire problem you haven't diagnosed.
For route planning, the electric scooter range guide helps put tire choice alongside load, hills and riding conditions. Use the pressure checks below to establish a sound baseline, and replace damaged tires rather than treating every loss of range as battery deterioration.
Why Wheel Size and Tire Grip Affect Safety
A small wheel meets a pothole lip or tram-track edge and gets knocked sideways. You have little time to recover, particularly if you're braking or turning. Puncture-proof doesn't mean fall-proof.
This image illustrates the kind of surface transition that deserves extra caution.
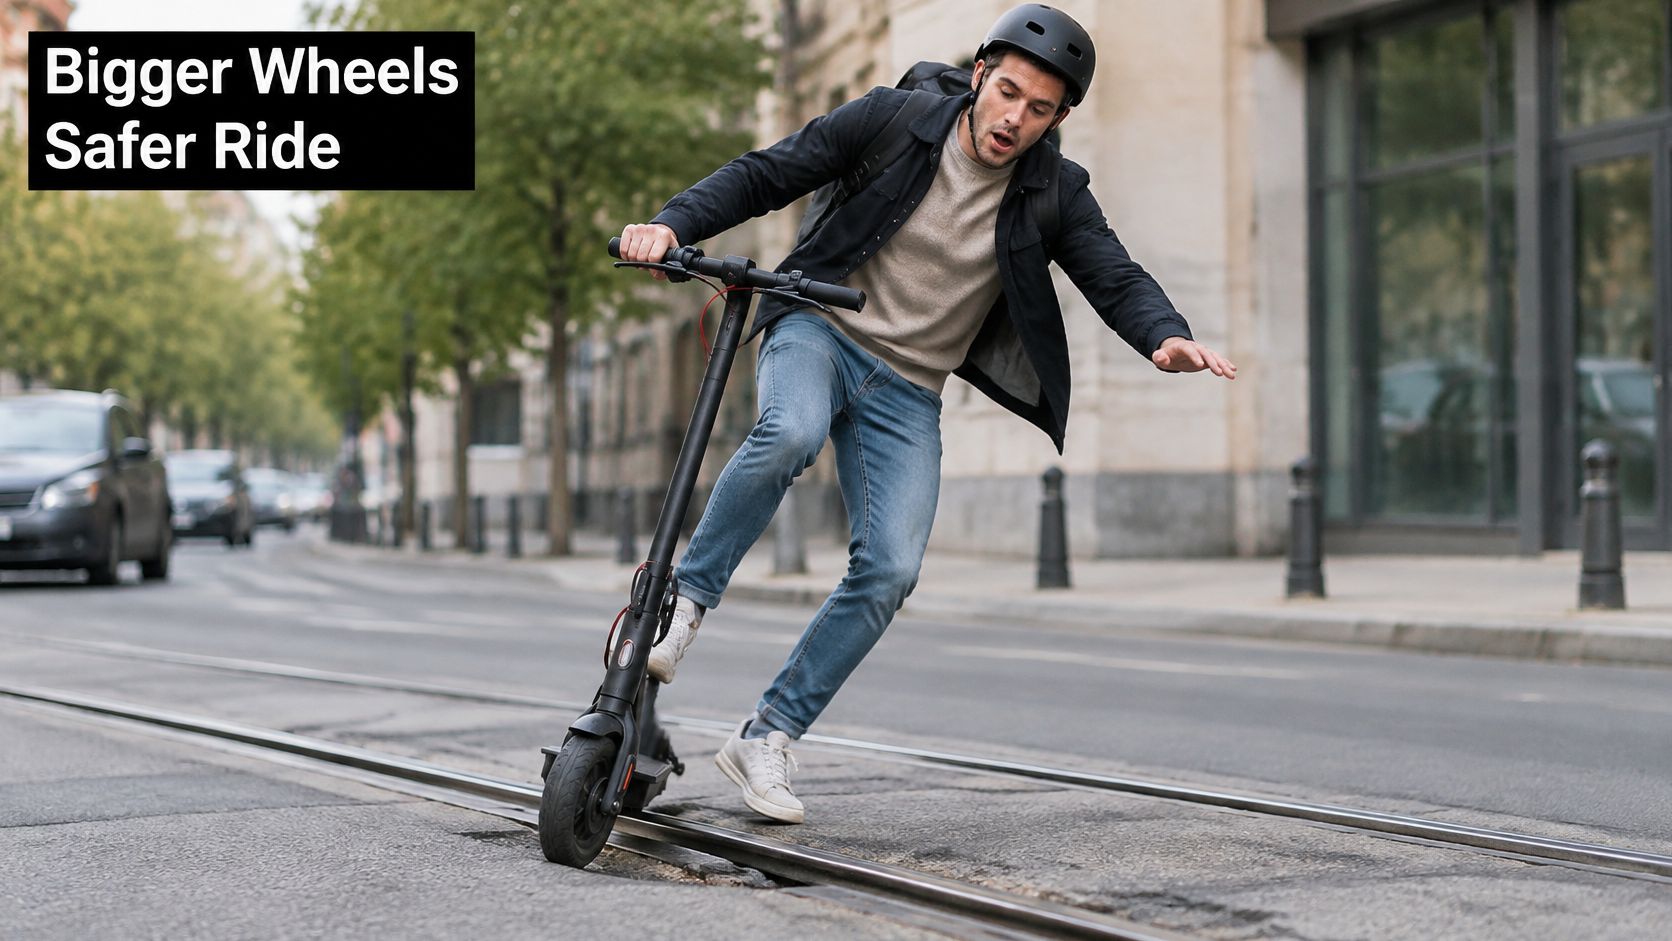
The OECD's Safer Micromobility review links smaller scooter wheels with a higher likelihood of falls and consequent head-injury risk. It also describes weaker emergency braking performance than bicycles and a move towards larger front wheels and air-chambered tires in newer shared fleets.
A larger rolling radius is less easily deflected by shallow surface damage. An inflatable chamber can deform around irregularities, helping the tire maintain road contact rather than bouncing across them.
A safer equipment checklist
- Choose an approved wheel package. Prefer the largest suitable setup offered for the model, rather than improvising an oversized conversion.
- Select a pneumatic or compliant air-chambered tire with adequate load capacity. Maintain its specified operating pressure.
- Replace worn tread before wet-weather use. Also slow down before painted markings, metal covers and tracks, where tread alone can't guarantee grip.
For a visual riding reference, the video is embedded below.
A solid tire may eliminate flats while transmitting more shock and reducing stability on uneven surfaces. Choose it because its compromise suits your route, not because the absence of air makes it automatically safer.
Setting the Right Pressure and Spotting Slow Leaks
Pressure advice can conflict: Popular Mechanics' maintenance guidance gives a general 40 to 50 psi target, while the model-specific manual example specifies 220 to 240 kPa, approximately 32 to 35 psi. Those aren't interchangeable instructions.
Tire size, casing, rim design and permitted load change the correct setting. Use your scooter's operating-pressure specification, and don't mistake a sidewall maximum for the recommended everyday pressure.
The maintenance flow below gives you a useful starting routine.
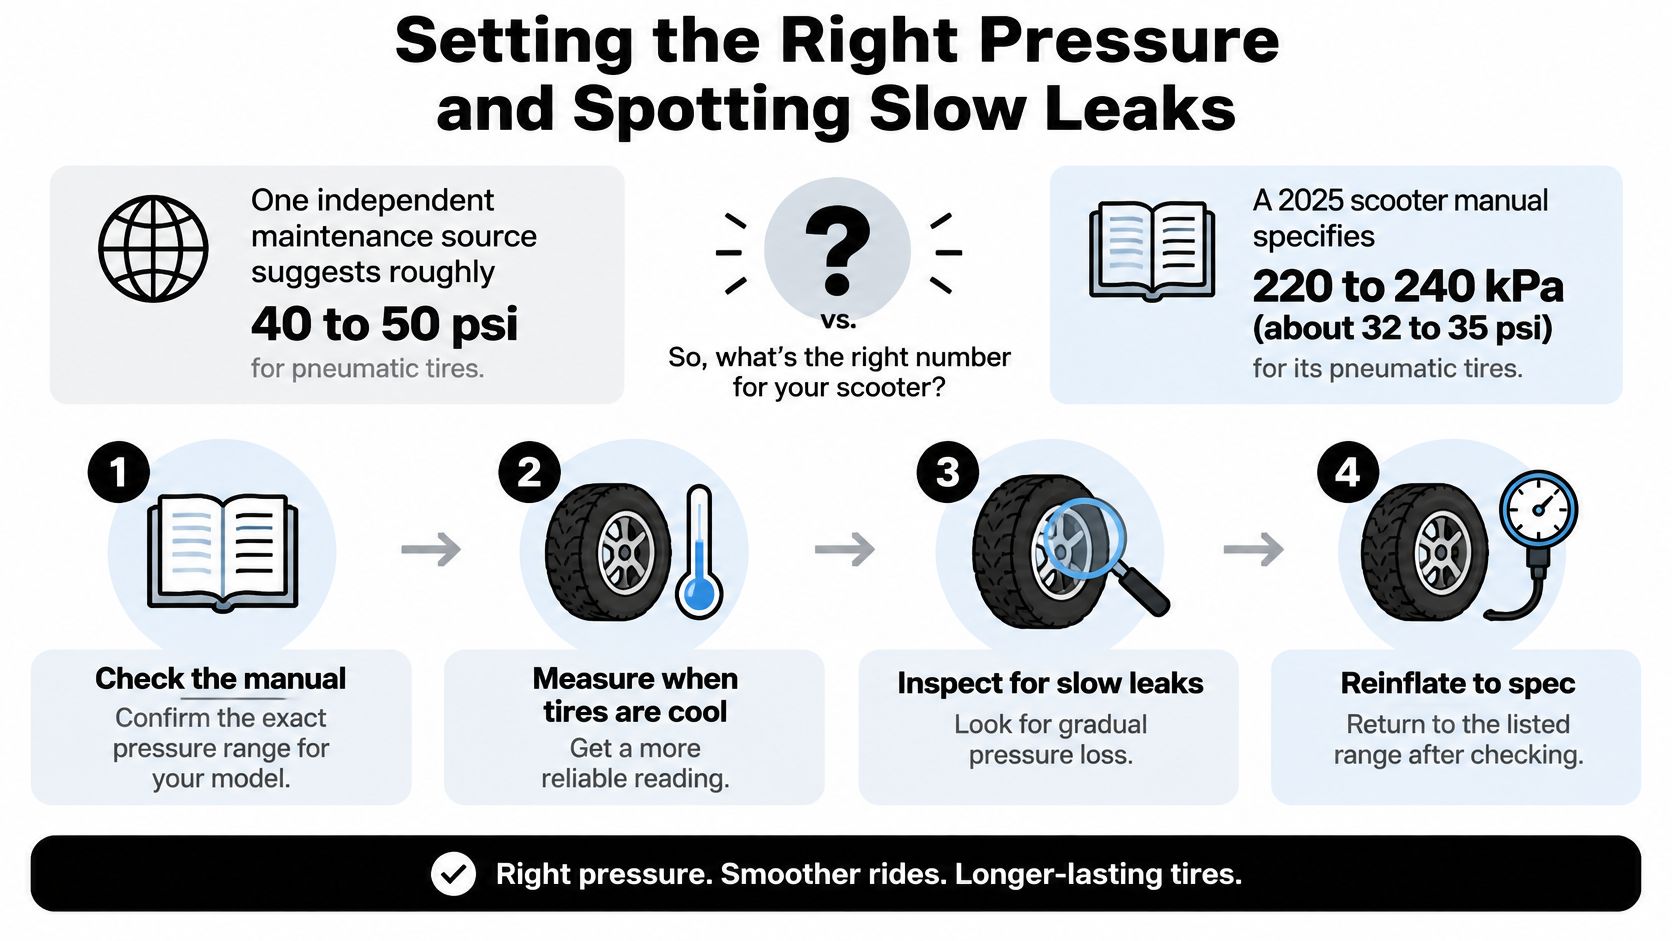
Diagnose before topping up again
- Measure both tires cold. Use a pressure gauge before riding, with a screw-on valve extension if access is tight.
- Find the operating pressure in the manual. Check that it remains within the tire and rim limits; resolve conflicting instructions before riding.
- Record readings over several days. Use the same gauge under similar temperature conditions so the comparison is useful.
- Spray diluted washing-up liquid around the valve. Growing bubbles indicate escaping air; on tubeless wheels, check the bead-to-rim joint too.
- Inspect the complete tread and sidewall. Look for nails, cuts, bulges and damage near the valve stem.
- Stop riding if there's structural damage or repeated pressure loss. A bulge needs replacement assessment, not another pump-up.
The manual example also treats tire compression of 20 to 30% as a reason to inflate. A gauge is still preferable to guessing by thumb pressure, particularly with stiff sidewalls.
Repeatedly adding air isn't a repair. Check the valve, tube or tubeless sealing surfaces before the next ride if the loss returns. Overinflation isn't insurance either: it makes impacts harsher and can reduce the contact patch, so stay within the specified operating range.
Maintenance Checks and Signs It Is Time to Replace
Electric scooter tire maintenance schedule
| Check | How often | Warning sign |
|---|---|---|
| Tire pressure | Before every ride, or at least weekly | Below the rated range or a soft feel |
| Tread depth | Monthly | Smooth patches or bare centre tread |
| Sidewalls and surface | Monthly | Cuts, cracks, bulges or embedded glass |
| Valve and rim | Monthly | Loose valve core or a bent or cracked rim |
| Wheel bolts and axle nuts | Every 2 to 4 weeks | Wobble or looseness |
| Sealant level (tubeless) | Every 3 months | Dried or low sealant, or repeated punctures |
This is a practical starting schedule. Follow a shorter manufacturer interval where specified, inspect after impacts, and use the sealant maker's service interval for your product and conditions.
Read the warning signs
A smooth centre strip means the original tread pattern has worn away. Don't wait for an autumn downpour to decide whether the remaining tire is suitable.
Cuts into the casing, exposed reinforcement and sidewall bulges mean stop. A cracked rim also needs attention before the wheel returns to service. On solid tires, look for missing chunks or separation from the rim.
Recurring tubeless leaks need diagnosis rather than endless sealant additions. If a wheel still wobbles after checking fasteners to the specified torque, investigate the tire seating, bearings, axle and rim.
For broader component identification, Flex Electric's moped parts advice for UK commuters is a useful companion, though moped parts aren't automatically compatible with kick scooters.
Replace without creating another fault
Match the complete tire specification, inspect the rim and valve, and remove any debris responsible for the original puncture. The guide to installing tires on rims provides preparation advice, but a difficult bead or motor-wheel removal may justify professional fitting.
Reinflate to specification and recheck seating and pressure after the first few rides. Keep the receipt and review warranty terms before dismantling the wheel yourself.
Choose Your Tire Setup for Your Commute
A rider following smooth cycle lanes has different priorities from someone crossing wet cobbles and patched suburban roads. Match the tire to the awkward parts of the journey, not just the pleasant stretch outside home.
Before choosing a public-road route, check legality. The UK government's rental-trial guidance applies to authorised rental scooters, not permission to ride a privately owned scooter wherever bicycles are allowed; EU rules also need checking locally.
Pick the compromise you can live with
- Smooth city lanes: For a hypothetical trip under 10 km daily, an approved 8.5 in or 10 in pneumatic or tubeless setup is a sensible efficiency-focused choice.
- Wet cobbles and tram tracks: Prioritise a compliant pneumatic tire with suitable tread. Avoid worn, slick solid tires, and adjust speed before slippery transitions.
- Potholed suburban routes: An approved 10 in tubeless setup is worth considering for cushioning without an inner tube to pinch.
- Gravel and muddy trails: A compatible fat tyre or 11 in pneumatic setup can suit the terrain. Check load capacity and access permissions rather than assuming off-road styling guarantees suitability.
- Flat avoidance above all: Solid or non-pressurised honeycomb tires suit riders willing to accept a firmer ride.
Our Punk Ride range includes Commuter Scooters, Folding Scooters, Fat Tyre Scooters, Off-Road Scooters and Performance Scooters. The specified scooter comes with a 2-year warranty; confirm the terms for your chosen model.
Before ordering, turn that route choice into a compatibility check.
Buying Checklist and Next Steps
A tire listing needs more than a familiar diameter and a puncture-resistant label. Check these details before paying, especially if you're changing construction rather than replacing like for like.
- Match the complete size. Compare the sidewall marking with the manufacturer's specification and your measured clearance.
- Confirm load capacity for the rider and cargo. A stronger tire doesn't increase the scooter's permitted load.
- Verify rim compatibility. Match bead-seat diameter, approved rim width and tire construction.
- For tubeless tires, confirm the rim is tubeless-compatible. Buy the specified sealant and valve arrangement rather than assuming any combination will seal.
- Compare measured rolling resistance where available. Give usable test information more weight than vague long-range or puncture-proof claims.
Buy for service life, not just shelf price
A cheaper tire isn't a saving if unsuitable construction or rapid wear means replacing it repeatedly. Include fitting difficulty, tube or valve replacement, sealant upkeep and access to repairs in the decision.
Check warranty terms before fitting parts yourself. Use the manufacturer-approved front and rear combination, normally matching construction unless the scooter was designed otherwise, rather than creating an untested mixed setup.
Choose the tire you can maintain properly, not the one whose maintenance you hope to ignore.
This week, note your route, photograph the sidewall, measure clearance and choose the construction that suits your priorities. Confirm compatibility, set the specified pressure and recheck after the first few rides, then put the maintenance schedule in your calendar.
Punk Ride LLC offers electric scooters, e-bikes and accessories, with scooter categories suited to different riding priorities. Visit Punk Ride LLC to compare the options, then check your chosen model's tire specification, load limit and maintenance needs before ordering.

Share:
Bike Trailer for Electric Bike: Buying, Fitting and Safety
Electric Bike Commute Time: Real Speeds and Trip Length