You put the key in, turn it, and the scooter stays dead. No dash. No throttle response. No click from the controller. Just silence.
That moment makes a lot of riders assume the battery is finished or the controller has failed. Sometimes that's true. But quite often the fault sits in a much smaller part, the electric scooter key switch.
This little barrel switch looks more important than it really is. In most scooters, it isn't some advanced immobiliser. It's a simple gate that either allows the scooter's power circuit to wake up or keeps it asleep. If it fails, the scooter can feel completely lifeless. If it's wired badly, the scooter can act strangely even with a brand-new switch fitted.
Your Key to Powering On

The first thing to understand is what the key switch does. On most commuter scooters, it's the main power gatekeeper. According to ElectricScooterParts key switch component information, over 95% of entry-to-mid-range electric scooters globally use a two-position off-on mechanical key switch design, usually operated with a simple twist or push.
That matters because it tells you something useful right away. Most key switches aren't complex. They're basic mechanical switches with simple wiring, and that means faults are usually straightforward too.
What the switch is really doing
In plain terms, the key switch opens or closes a circuit. When you turn the key to on, it lets the scooter's control system receive the signal or power path it needs to wake up. When you turn it off, that path is broken.
On many common scooters, the key can only be removed in the off position. That's normal. It stops you riding off and dropping the key somewhere on the road, and it also reduces accidental power-up when the scooter is parked.
Practical rule: Treat the key switch as an electrical on-off command first, and a security feature second.
If you've come from cars or motorbikes, this can be misleading. A scooter key barrel often looks like an ignition lock, but electrically it's usually much closer to a simple handlebar switch than a true automotive anti-theft system.
Why riders get confused
A dead scooter doesn't always mean the switch itself has failed. It can also mean:
- The battery isn't supplying power
- A fuse has opened
- A connector has loosened under vibration
- The controller isn't waking up
- Corrosion has built up in the switch wiring
That's why it helps to think of the key switch as one stop in a chain, not the whole system.
If you're trying to keep a commuter scooter reliable through wet UK winters or year-round EU city use, a basic care routine helps more than people think. A simple electric scooter maintenance checklist from Punk Ride is worth keeping in mind, especially if your scooter lives outdoors or gets folded and carried often.
The short version
Most riders don't need to memorise wiring diagrams. You just need this working definition:
The electric scooter key switch is the part that tells the scooter to power up or stay off. If it can't make that electrical connection cleanly, nothing else wakes up.
That's the starting point for proper diagnosis. Not guesswork. Not ordering random parts. Just proving whether the switch is doing its job.
Diagnosing a Faulty Key Switch
Before you buy anything, test the scooter properly. A lot of “bad key switch” jobs turn out to be loose spade connectors, corroded joins, or another fault entirely.

Start with the obvious stuff
Don't reach for the soldering iron first. Check the simple failures that waste the most time.
-
Battery charge
Make sure the pack is charged and connected. A half-seated connector can mimic a dead ignition switch. -
Fuse condition
If your scooter has an inline fuse or pack fuse, inspect it. Don't eyeball it only. Confirm it properly. -
Visible wiring damage
Look for rubbed insulation, green corrosion, burnt plastic, or connectors that have backed out of the plug body. -
Key barrel feel
If the barrel feels rough, jammed, or unusually loose, the internal switch may have broken away from the lock cylinder.
If you're already seeing a display fault along with key switch trouble, a fault-code reference like Punk Ride's E2 error code guide can help you separate ignition issues from controller or communication faults.
Use a multimeter instead of guessing
The cleanest test is a continuity check across the switch terminals. Remove power first, disconnect the switch if possible, then test the terminals with the key off and on.
You want one result with the key off, and a changed result with the key on. If the reading doesn't change when you turn the key, the switch internals may not be closing the circuit.
If a switch never changes state on the meter, it doesn't matter how shiny the outside looks. It's not doing the job.
For beginners, it can help to read a simple household switch example first, because the test logic is the same even if the application is different. Bulls Eye Repair's how-to guide shows the basic thinking behind checking whether a switch is opening and closing a circuit, which is exactly the mindset you want here.
The bypass test
A temporary bypass can tell you a lot. With the scooter safely supported and the drive wheel clear, you can temporarily join the switch circuit as a test. If the scooter wakes up, the switch or its immediate wiring is the likely culprit. If nothing changes, the fault is further down the chain.
A few cautions matter here:
- Disconnect battery power before making or changing test connections
- Only bridge the intended switch circuit
- Never let bare wires touch the frame or each other randomly
- Keep the wheel off the ground before any live test
This isn't a permanent fix. It's a diagnostic step.
What usually gives the game away
In the workshop, the most common clues are boring ones:
- intermittent power when you wiggle the key
- lights flickering as the bars turn
- a connector that looks dull or crusty
- a switch that tests fine off the scooter but fails under vibration
That last one catches people. Bench testing helps, but a switch mounted in a rattling stem or wet front panel can fail only when the scooter is assembled and moving.
Gathering Your Tools and Replacement Part
Good repairs start before you remove a single screw. If you have the wrong switch, poor connectors, or no way to test continuity, you'll end up doing the same job twice.
What to put on the bench first
A small ignition-switch job doesn't need a giant toolkit, but it does need the right basics:
| Item | Purpose | Pro Tip |
|---|---|---|
| Multimeter | Checks continuity, voltage presence, and basic circuit behaviour | Use continuity mode first, then voltage mode only when you know where the live feed should be |
| Screwdriver set | Opens deck covers, dash housings, and stem panels | Magnetic tips help when screws drop into narrow housings |
| Trim tool or plastic pry tool | Separates plastic covers without chewing them up | Better than a flat screwdriver on painted panels |
| Wire strippers | Removes insulation cleanly for splicing or reconnecting | Don't use side cutters as strippers unless you're very controlled |
| Soldering iron | Makes durable wire joins where plugs aren't used | Keep heat short so you don't wick solder too far up the wire |
| Heat shrink tubing | Insulates and seals joins | Slide it onto the wire before you solder, not after |
| Electrical tape | Temporary bundling and added abrasion protection | Don't rely on tape alone for primary insulation |
| Side cutters | Trims damaged wire and old cable ties | Flush cuts leave a neater result |
| Replacement connectors or terminals | Restores damaged plug ends | Match connector type before cutting anything off |
| Camera phone | Records original wiring layout | Take photos from two angles, not one |
Picking the right replacement switch
A lot of DIY jobs go off track at this point. The replacement has to match in three ways.
First, electrical layout. Some scooters use a simple two-wire switch. Others use a three-wire arrangement tied into the controller's lock circuit.
Second, physical fit. Barrel diameter, thread length, key orientation, and connector style all matter. A switch can be electrically correct and still be unusable if it won't seat in the dash or stem clamp.
Third, system type. LCD-equipped scooters often use a different wake-up logic than older basic models. If your scooter uses a key switch with a controller lock lead, buy for that setup, not just for voltage range listed by the seller.
Parts sourcing without guesswork
If your scooter's maker sells original parts, start there. If not, compare the old switch in your hand against listing photos, wire count, mounting measurements, and connector shape.
For riders who already buy accessories or spares through broader mobility retailers, Punk Ride is one example of a store that carries electric ride products across scooter and e-bike categories, but for a key switch specifically, what matters most is exact compatibility rather than brand familiarity.
Buy the replacement after you identify the wiring type. Not before.
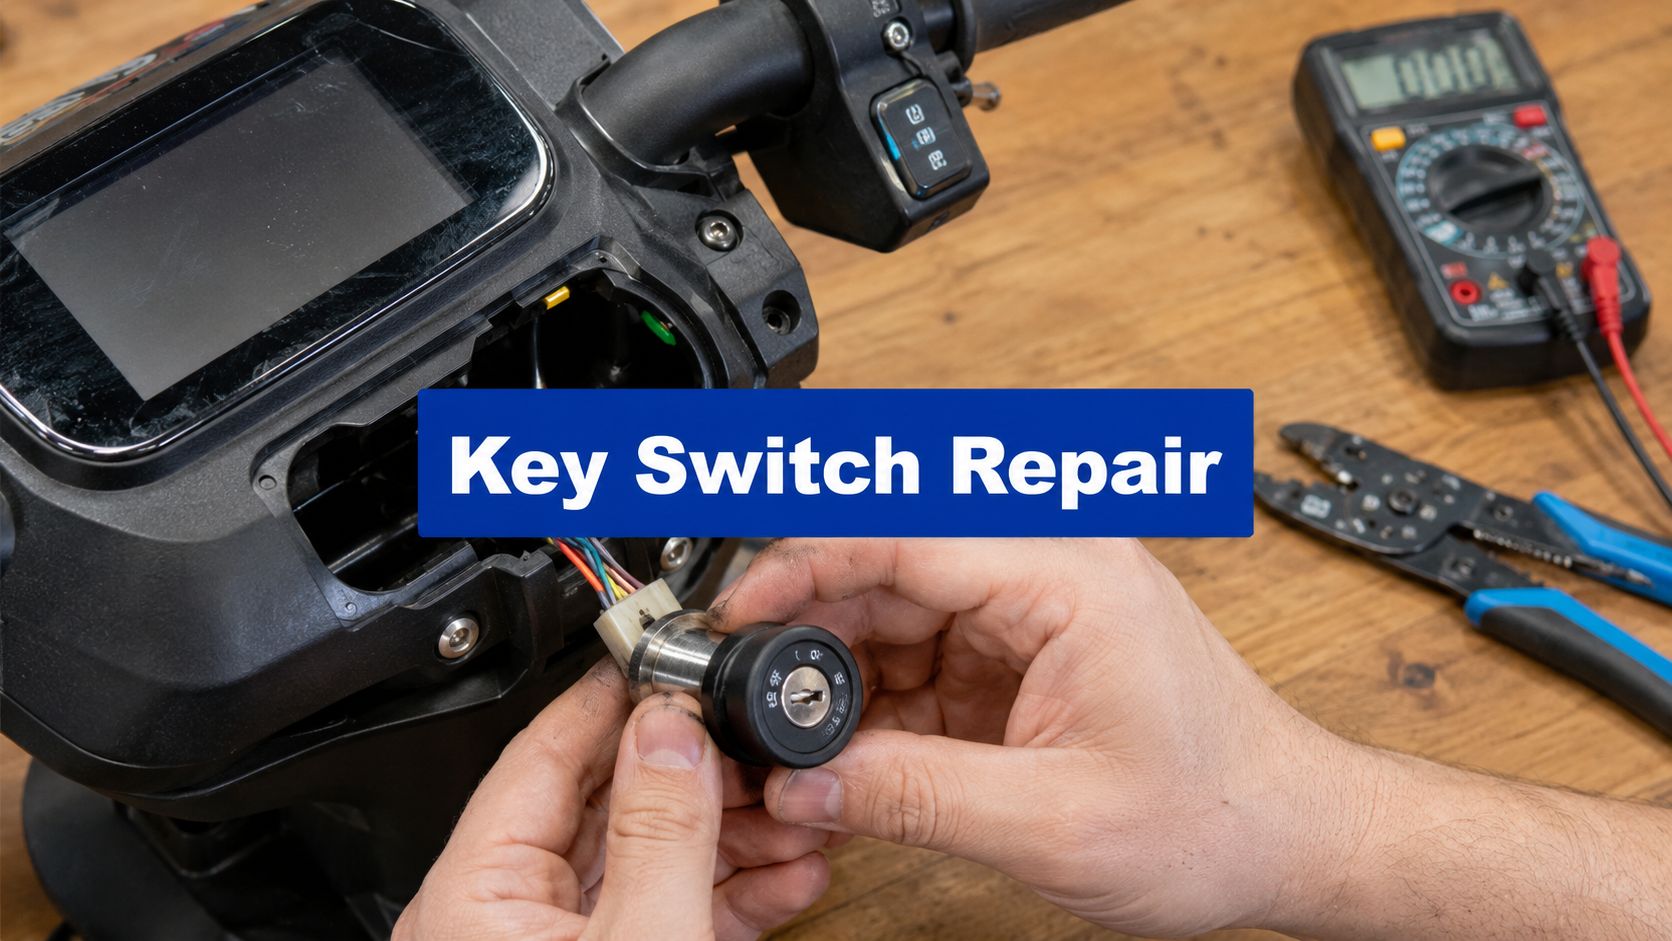
Safe Removal and Installation Guide
Disconnect the battery before anything else. That isn't a polite suggestion. One accidental short can damage wiring, connectors, or the controller.

Getting the old switch out
Most scooters hide the key switch in one of three places: the deck side panel, the front stem cover, or an integrated dash panel. Remove panels carefully and keep screws grouped in the order they came out.
Before unplugging anything, take clear photos. Don't trust memory, especially if the wires are faded, dusty, or all black with tiny tracer markings.
Then work through removal in order:
- Isolate power first by removing the battery pack or disconnecting the relevant battery lead.
- Open the access panel without forcing tabs. Brittle plastics crack easily in cold weather.
- Follow the switch wires all the way to the connector or splice point.
- Label wires if needed with tape flags before separating them.
- Undo the mounting nut or clip that holds the barrel in place.
- Withdraw the switch gently so you don't tear a short harness.
If the old switch is soldered rather than plugged in, cut only when you've confirmed wire identity and left enough length for a proper reconnect.
A general reference on practical methods for switch wiring can be useful if you need a refresher on making tidy, well-insulated switch connections, especially if your replacement doesn't come with a matching plug.
The wiring point that matters most
On many brushless-controller scooters, the key switch should go to the controller's lock or switch input, not the main battery positive feed. A teardown-based installation guide for 24V to 72V brushless-controller scooter key switches shows a common three-wire arrangement: black to battery/controller negative, green to battery/controller positive, and red to the controller lock wire, and it warns that connecting the red wire to the big battery-positive line can leave the LCD voltage indicator permanently on after shutdown in that setup, as shown in this 24V-72V scooter key switch wiring walkthrough.
That one mistake causes a lot of “new switch fitted, weird behaviour now” complaints.
Workshop habit: If a display stays alive after key-off, stop and check whether the switch is feeding the wrong line before blaming the new part.
Here's the install rhythm that works:
- Mount the new switch loosely.
- Route the wires exactly as the original harness sat.
- Make the electrical joins.
- Insulate each join properly.
- Reconnect battery power for a brief function test.
- Confirm off means fully off.
- Reassemble only after that test passes.
Here's a visual walkthrough if you prefer to watch the process before doing it on your own scooter.
Making connections that last
A key switch lives in a rough environment. Vibration, rain, folding stems, and repeated bar movement all punish weak joins.
Use these standards:
- Crimp properly or solder properly. Half-done versions of either method fail.
- Cover bare conductor fully with heat shrink, not just tape.
- Support the harness so the joint isn't carrying all the movement.
- Keep wires clear of sharp edges inside metal stem channels and deck openings.
If your scooter is used in the UK, northern Europe, or any wet coastal area, give extra attention to sealing and strain relief. Water doesn't need much of a gap to start corrosion.
Troubleshooting Your New Installation
A new switch can still leave you with problems. Sometimes the scooter stays dead. Sometimes the display won't turn off. Sometimes power comes and goes when you move the bars. Those symptoms usually point to installation error, not a bad new part.
A useful reality check comes from the urban mobility research cited earlier. Real-world testing data indicates that 91% of key switch failures in recent years were due to improper wire connections during installation, rather than inherent switch defects, as noted in this ScienceDirect research summary on e-scooter rider profiles and key-switch-related findings.
Match the symptom to the likely cause
If the scooter is still completely dead, start with continuity through the new switch and then verify battery power is reaching the relevant feed. A perfect-looking installation can still hide a loose crimp inside insulation.
If the LCD stays on after key-off, go back to the controller wake-up wiring. That symptom often means the switch has been tied into the wrong live path.
If the power cuts in and out when turning the bars, look for harness tension. Many stem-mounted switches fail because the wire bundle is stretched too tight and pulls at the connector when the bars rotate.
The post-install checklist
Run this slowly and in order:
-
Recheck wire identity
Don't trust colour alone if the replacement loom differs from the original. -
Inspect every joint by hand
Tug lightly. A bad crimp often looks fine until you pull on it. -
Look for cold solder joints
Dull, lumpy solder usually means poor flow and weak conductivity. -
Confirm no accidental shorts
Pay attention anywhere the loom passes metal edges or clamp points. -
Test with panels still off
If it works open but fails once reassembled, a wire is being pinched or bent too sharply.
A scooter that powers up only when the panel is hanging loose usually has a routing problem, not an electronic mystery.
When to stop chasing the switch
There's a point where the key switch is no longer the prime suspect. If the switch has proper continuity, the wake wire is getting the expected response, and the scooter still won't initialise, start looking at the controller, battery output, or display unit instead.
That's especially relevant on newer integrated LCD systems used widely across the US and Australian markets as well as UK and EU commuter models. Once the switch is proven good, keep moving down the chain. Don't keep replacing the same part.
Security Realism and Sourcing Parts
A lot of scooter owners assume a key barrel means proper theft protection. It usually doesn't.
Independent teardown-style evidence shows a common scooter key switch can often be bypassed because it's only interrupting a simple circuit, which is why the more honest view is that it acts as a visual deterrent and power interrupter rather than high-security protection, as discussed in this electric scooter key switch bypass and security realism video.
What that means in real life
If someone opportunistic sees a keyed scooter next to a keyless push-button scooter, the keyed one may look less inviting. That helps a bit.
But if someone has time, privacy, and basic tools, the switch alone isn't enough. Treat it as one layer only. For actual theft prevention, use a serious physical lock and park with more care than confidence.
A practical locking guide like Punk Ride's advice on how to lock an electric scooter is a better place to focus your anti-theft effort than relying on the ignition barrel by itself.
Where to buy a replacement without regrets
For the switch itself, buy from one of these channels:
- Manufacturer parts support if your scooter brand still stocks the original unit
- Dedicated mobility parts sellers that show wire count, barrel size, and connector style clearly
- Local repair shops that can match the switch by sight if you bring the old one in
If your real problem is a lost or damaged key rather than a failed switch body, it can also help to read outside the scooter world. Blade Auto Keys has a useful overview of replacement-key thinking, identification, and what information matters when you're trying to match keys and lock hardware.
The simple rule is this: buy for fit, wiring, and connector type, not for a generic listing title that says it suits “most scooters.”
If you'd rather compare replacement-ready scooters, commuter models, and practical riding accessories in one place, take a look at Punk Ride LLC. They stock electric mobility products for riders in the US, UK, and Europe, and their blog also covers the kind of maintenance and lock-up advice that helps you avoid repeat repairs.
Share:
The 7 Best Electric Bike YouTube Channels for 2026
Electric Scooter Kit: Your UK & EU Upgrade Guide for 2026